• Skip to primary navigation
  • Skip to main content
  • Skip to primary sidebar
  • About Us
  • Affiliate Disclosure
  • Contact us
  • Cookie Privacy Policy
  • Privacy Policy
  • Sample Page
  • Terms of Use

Kitchen Guide

  • Appliance Reviews
  • Bakeware
  • Buying Guides
  • Product Comparisons
  • Recipes
  • Essentials
  • Cleaning

Essentials

How to Clean a Stainless Steel Cookie Sheet: Easy 5 Methods

January 31, 2025 by bigfishtavernlagunaadmin Leave a Comment

Stainless Steel Cookie Sheet

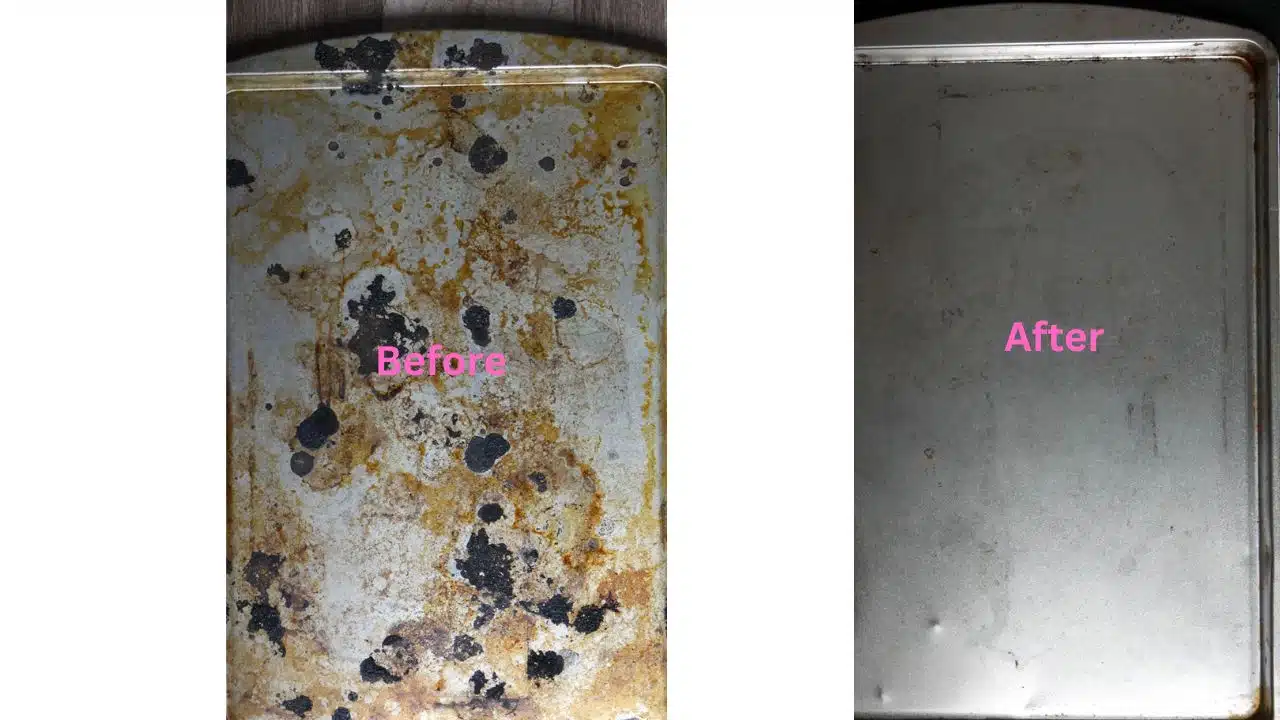
A stainless steel cookie sheet is a reliable and long-lasting kitchen essential. However, frequent use can lead to burnt-on stains, grease buildup, and discoloration. Properly cleaning your stainless steel cookie sheet helps extend its lifespan and ensures safe, effective baking. In this guide, we’ll explore five easy and effective methods to clean a stainless steel cookie sheet while maintaining its quality and shine.

Why Proper Cleaning Matters

Before diving into the methods, let’s understand why proper cleaning is essential:

  • Prevents Build-Up – Grease and food residue can accumulate, affecting performance.
  • Maintains Durability – Reduces the risk of rust and corrosion.
  • Enhances Hygiene – Ensures a clean and safe baking surface.
  • Improves Baking Results – A clean sheet prevents uneven cooking and burning.

5 Easy Methods to Clean a Stainless Steel Cookie Sheet

Here are five tried-and-true methods to keep your stainless steel cookie sheet in top condition:

1. Baking Soda and Vinegar Method

This natural cleaning duo is great for tackling stubborn stains and burnt-on residue.

Steps:

  1. Sprinkle a generous amount of baking soda over the sheet.
  2. Sprinkle white vinegar over the baking soda and let it fizz up.
  3. Let it rest for 10-15 minutes to help break down the grime.
  4. Scrub gently using a non-abrasive sponge or brush.
  5. Rinse thoroughly with warm water to remove any residue.
  6. Dry immediately with a clean towel to prevent water spots.

2. Hydrogen Peroxide and Baking Soda Method

For extra-tough stains, hydrogen peroxide works as a powerful cleaner.

Steps:

  1. Sprinkle baking soda over the sheet, ensuring even coverage.
  2. Pour hydrogen peroxide over the baking soda, creating a paste.
  3. Allow it to sit for 1-2 hours to break down stubborn stains.
  4. Scrub with a sponge or brush in circular motions to lift grime.
  5. Rinse well with warm water and dry completely to prevent streaks.

3. Dish Soap and Hot Water Soak

A simple but effective method for light cleaning and grease removal.

Steps:

  1. Fill your sink with hot water and add a few drops of dish soap.
  2. Submerge the cookie sheet and let it soak for at least 30 minutes.
  3. Use a soft sponge or brush to scrub off any remaining residue.
  4. For tougher spots, use a mixture of dish soap and baking soda.
  5. Rinse thoroughly with clean water and dry immediately to avoid water stains.

4. Lemon and Salt Scrub

Lemon’s acidity and salt’s abrasiveness make a great natural cleaner for tackling stains and discoloration.

Steps:

  1. Sprinkle coarse salt generously over the cookie sheet.
  2. Cut a lemon in half and use the cut side to scrub the surface.
  3. Apply slight pressure while scrubbing to lift stains and grease.
  4. Allow the lemon juice to sit for about 10 minutes for better cleaning action.
  5. Rinse thoroughly with warm water and dry completely with a soft cloth.

5. Commercial Stainless Steel Cleaner

For professional-level cleaning, a stainless steel cleaner is highly effective in restoring shine and removing stubborn residues.

Steps:

  1. Apply a small amount of stainless steel cleaner to the sheet.
  2. Use a soft cloth or sponge to scrub the surface gently.
  3. Follow the manufacturer’s instructions regarding application and duration.
  4. Rinse thoroughly with water to remove any cleaner residue.
  5. Dry immediately to maintain a polished, streak-free appearance.

Additional Tips for Maintaining Your Stainless Steel Cookie Sheet

Avoid Abrasive Scrubbers – Using steel wool and harsh scrubbers can scratch the surface, shortening its lifespan.

Dry Immediately – Prevents water spots and rust formation by using a clean towel after washing.

Use Parchment Paper – Minimizes residue buildup during baking, making cleaning easier.

Store Properly – Keep it in a dry area and avoid stacking heavy cookware on top of it to prevent damage.

Regular Maintenance – Clean your cookie sheet immediately after use to prevent stubborn stains from developing.

Common Cleaning Mistakes to Avoid

Skipping Regular Cleaning – Leads to stubborn buildup that becomes harder to remove over time.

Using Harsh Chemicals – Strong acids or industrial cleaners may damage the stainless steel surface and degrade its quality.

Not Drying Properly – Leaving the sheet damp can cause discoloration, water spots, and even rust in extreme cases.

Overheating the Sheet – Excessive heat exposure can lead to warping, making it harder to clean and use effectively.

Finishing Statement

Keeping your stainless steel cookie sheet clean doesn’t have to be a challenge. By using these five easy methods, you can maintain its quality, extend its lifespan, and ensure great baking results. Whether you prefer natural cleaning solutions like baking soda and vinegar or opt for commercial stainless steel cleaners, regular maintenance will keep your bakeware looking and performing at its best.

By incorporating these tips into your cleaning routine, you’ll keep your stainless steel cookie sheet in top condition for years to come. Happy baking!

Filed Under: Essentials

Everything You Need to Know About Crumble Cookie Cutters

January 4, 2025 by bigfishtavernlagunaadmin Leave a Comment

Crumble cookie cutters have taken the baking world by storm, transforming ordinary cookies into delightful creations. Whether you’re a seasoned baker or just getting started, having the right tools always makes your job easier. In this article we have tried to explain, types of cookie cutters, techniques to choose the perfect cookie cutter, how to use a cookie cutter, how to care for it, and also inspiring cookie designs to try at home. Let’s make your baking experience fun, flavorful, and picture-perfect!

Crumble Cookie Cutters


Why Are Crumble Cookie Cutters So Popular?

Crumble cookie cutters have gained popularity due to several reasons, appealing to both baking enthusiasts and casual users. Here’s why they’re trending:

Precision and Consistency: Crumble cookie cutters create perfectly shaped cookies every time. Their designs ensure uniformity, making cookies look professional and Instagram-worthy.

Creative Designs: They come in a wide variety of unique shapes and patterns, from classic circles to themed cutters for holidays or special occasions.

High-Quality Materials: Crumble cookie cutters are typically made from sturdy. food-safe materials like stainless steel or BPA-free plastic, ensuring safety and durability.

Easy to Use and Clean: Their ergonomic designs ensure they are easy to use, even for beginners. Additionally, many are dishwasher-safe, adding to their convenience.

Influence of Social Media: Crumble cookies have become a social media sensation, with users showcasing their creations online. The cutters’ role in producing visually appealing cookies adds to their allure.

Versatility: These cutters aren’t limited to cookies—they’re also used for cutting sandwiches, fondant, fruit, and more, making them a versatile kitchen tool.

DIY and Home Baking Trend: As home baking grows in popularity, tools like Crumble cookie cutters enable users to replicate bakery-style treats at home.

Gift-Worthy Appeal: With their trendy designs and practicality, these cutters make for excellent gifts for baking enthusiasts.

Would you like me to expand on any of these points or help you create content using this topic?


Types of Crumble Cookie Cutters

Crumble cookie cutters come in various shapes, sizes, and materials. Let’s explore the most common types:

Plastic Crumble Cookie Cutters

  • Pros: Lightweight, affordable, and often dishwasher safe.
  • Cons: May not cut through thicker doughs as cleanly.
  • Best For: Kids or beginner bakers.

Metal Crumble Cookie Cutters

  • Pros: Precise cuts, durable, and ideal for detailed designs.
  • Cons: Requires hand washing to prevent rusting.
  • Best For: Advanced bakers who want professional results.

Custom 3D-Printed Cutters

  • Pros: Unique, customizable designs tailored to your needs.
  • Cons: Can be expensive and require careful cleaning.
  • Best For: Special occasions or personalized baking projects.

Crumble Cookie Cutters

Choosing the Perfect Crumble Cookie Cutter

Selecting the right cookie cutter depends on a few factors:

Consider the Material

  • Plastic Cutters: Lightweight and easy to use, plastic cutters are perfect for beginners and kids. They come in fun shapes, are often dishwasher safe, and are affordable. However, they may not work well with dense doughs.
  • Metal Cutters: If you’re aiming for detailed designs and sharp, clean cuts, metal cutters are the way to go. They are durable and provide professional-level results, making them ideal for advanced bakers. Keep in mind that they may require hand washing to avoid rust.
  • 3D-Printed Cutters: For a truly personalized baking experience, custom 3D-printed cutters are a great option. They offer intricate and unique designs, though they can be more expensive and require careful cleaning.

Shape and Design

Think about the type of cookies you want to make. If you’re baking for a holiday or special occasion, cutters with festive shapes like stars, hearts, or snowflakes might be a fun choice. If you’re looking for professional-level designs, consider intricate shapes with detailed patterns that will stand out. Ensure the cutter fits the theme of your baking project.

Size Matters

Cutter sizes vary, and it’s important to choose one that matches the type of cookies you’re making. For bite-sized treats, smaller cutters work best. For larger cookies that need to make a statement, opt for bigger cutters.

Ease of Use and Maintenance

If you’re a beginner, choose a cutter that’s easy to handle and clean. Plastic cutters are typically lightweight and dishwasher-safe. For more advanced bakers, metal cutters may require more maintenance, but they offer the best precision and durability. Custom 3D-printed cutters might need special care due to their intricate designs.

Purpose and Frequency of Use

For occasional bakers, a plastic or metal cutter might suffice. If you’re baking frequently or need cutters for special events, investing in custom 3D-printed cutters can add a personal touch.

Crumble Cookie Cutters


Beyond Cookies: Unexpected Uses for Crumble Cookie Cutters

Crumble cookie cutters are versatile tools, ideal for a range of creative applications beyond baking cookies. Here are some unexpected uses:

Cutting Sandwiches
Use a cookie cutter to create fun shapes for sandwiches, perfect for kids’ lunchboxes or party platters.Elevate a basic sandwich into a stunningly appetizing creation.

Fruit and Veggie Shapes
Make fruits and vegetables more exciting by cutting them into playful shapes. This is a wonderful way to inspire kids to eat healthier or to craft decorative fruit salads.

Fondant and Cake Decorations
Cookie cutters are ideal for cutting fondant into shapes for cake decorating. Create intricate designs to enhance cakes, cupcakes, or cookies with minimal effort.

Jellies and Gelatin Treats
Use cookie cutters to shape homemade gelatin or fruit jellies into fun, themed designs for parties or special events.

These creative alternatives show that crumble cookie cutters can be as versatile as your imagination!


How to Use Crumble Cookie Cutters Effectively

Crumble cookie cutters are versatile tools for creating perfectly shaped cookies. To use them properly, begin by selecting the appropriate cutter size and shape for your recipe. Make sure your dough is chilled yet flexible to avoid sticking and preserve clean edges. Roll the dough to an even thickness, typically ¼ inch, using a rolling pin. A consistent thickness ensures uniform baking.

Before cutting, sprinkle the cutter with flour or powdered sugar to prevent sticking. Position the cutter firmly on the dough, pressing straight down without twisting. Twisting can distort the shape. Gently lift the cutter, then transfer the cut dough to a parchment-lined baking sheet using a flat spatula to maintain the shape.

For intricate designs, use a toothpick or small tool to remove excess dough from detailed areas. If using fondant or icing toppers, match the cutter size to ensure a seamless fit. Once you’re done, clean the cutter with warm soapy water, ensuring every crevice is spotless.

Crumble cookie cutters can also be used for shaping fruits, sandwiches, or fondant for added creativity. With proper technique and care, these tools make baking fun and visually appealing.

Crumble Cookie Cutters

How to Care for Your Crumble Cookie Cutters

  • Clean After Each Use:For plastic cutters, clean them with warm soapy water and a gentle cloth. For metal cutters, hand wash them to prevent rust.


  • Dry Thoroughly: Always dry your cutters completely after washing, especially metal ones, to avoid moisture buildup that can cause rust or deformation.


  • Remove Dough Residue: If dough sticks to your cutters, use a soft brush or cloth to gently clean off any residue. Avoid harsh scrubbing that could damage the design.


  • Store Properly: Store your cutters in a cool, dry location to shield them from heat and humidity. Keep them in an organized container to avoid bending or warping.


  • Avoid Soaking: Avoid soaking metal cutters for extended periods to prevent rusting. Instead, clean them quickly and dry them thoroughly.


  • Check for Damage: Regularly inspect your cutters for any wear or cracks. Replace damaged cutters to maintain their effectiveness.


Inspiring Cookie Designs to Try at Home

Themed Cutters for Occasions: Use cookie cutters shaped like hearts, stars, or flowers for holidays and special events. Customize them with colorful icing, sprinkles, or edible glitter to enhance the design.

Intricate Royal Icing Designs: Try decorating cookies with royal icing to create delicate patterns like lace, flowers, or intricate borders. Piping techniques can add beautiful details, giving your cookies a professional look.

Marbleized Cookies: Mix different colored doughs before baking to create a stunning marble effect. This trendy design adds a unique touch to each cookie, making them visually striking.

Artistic Cookie Designs: Decorate cookies to look like miniature works of art, such as animals, landscapes, or portraits. Use edible paint, food coloring, or fine piping to bring your artistic vision to life.

Embossed and Stamped Textures: Use embossing tools or stamps to create textured patterns on your cookie dough before baking.This brings a refined and graceful touch to your cookies.

Edible Glitter and Metallic Accents: Add a touch of glamour to your cookies by dusting them with edible glitter or using metallic food paints to highlight details. These accents can make your cookies sparkle and shine.

Filed Under: Essentials

How to Control Ammonia in Fish Tanks: Effective Ways

November 7, 2024 by bigfishtavernlagunaadmin Leave a Comment

Ammonia in fish tanks can be a grave concern for aquatic life, leading to stress, illness, and even death among fish. Controlling ammonia levels is crucial for keeping a fish tank healthy and ensuring a thriving aquarium environment. This article will guide you through recognizing the signs of ammonia buildup, understanding its causes, and exploring both chemical and natural methods to manage and reduce these levels.

How do you Reduce Ammonia in a Fish Tank

Signs of too Much Ammonia in Fish Tank

High ammonia levels in an aquarium often manifest through clear signs from your fish and the tank environment:

  • Fish Symptoms: Gasping at the surface, lethargy, and unusual swimming patterns.
  • Physical Signs: Red or inflamed gills, and fish may die without visible symptoms.
  • Tank Indicators: Cloudy water and foul smell can also indicate ammonia problems.

What Causes High Ammonia Levels in Fish Tank

Ammonia levels can rise due to several factors

  • Overfeeding: Excess food decays and produces ammonia.
  • Overstocking: More fish produce more waste, which breaks down into ammonia.
  • Inadequate Filtration: Poor filtration fails to remove waste products, allowing ammonia to accumulate.
  • Infrequent Water Changes: Without regular changes, ammonia from waste builds up in the water.

Reduce Ammonia in a Fish Tank

Ammonia (NH3) is a toxic compound that results from the breakdown of fish waste, uneaten food, and decomposing plants in your fish tank. In high concentrations, it can harm fish gills and organs, leading to disease or death.

There are several effective strategies to reduce ammonia in your aquarium:

Chemical Solution

Chemical solutions like Ammonia Detoxifiers and Zeolite Crystals neutralize or absorb ammonia, offering quick relief. Activated Carbon and Ammonia-Removing Filter Media improve water quality, while Water Conditioners treat new water during changes. However, these are temporary fixes; combine them with natural, preventative strategies like regular maintenance and biological filtration for lasting ammonia control.

Regular Water Changes

Perform weekly 50% water changes to remove accumulated waste and toxins. This not only reduces ammonia levels but also improves overall water quality and oxygen levels in the tank.

Live Plants

 Adding live plants like Anubias, Java Fern, or Elodea helps absorb ammonia as they grow, using it as a nutrient. Live plants also increase oxygen levels, further supporting tank health and reducing ammonia buildup.

Cycling the Tank

To cycle your tank, add an ammonia source, monitor ammonia, nitrite, and nitrate levels, and wait 4-6 weeks for stability. Once levels are safe, perform regular maintenance to sustain a healthy, biologically balanced environment for your fish.

Expert Insights on Managing Ammonia

Dr. Jane Smith, a renowned marine biologist, emphasizes the importance of biological balance in aquariums. She notes, “Regularly testing your water parameters is crucial. Ammonia spikes can be a sign of underlying issues with tank maintenance or biological filtration inefficiencies.”

Veterinarian Dr. Mike Brown adds, “In addition to water changes and proper feeding practices, consider introducing ammonia-absorbing plants. They enhance aesthetic appeal while actively improving water quality.”

Filed Under: Essentials

How to Lower PH in Fish Tank: Easy 3 Steps!

November 6, 2024 by bigfishtavernlagunaadmin Leave a Comment

Lowering the pH in a fish tank can be crucial for fish that thrive in more acidic water. To safely reduce pH, start by adding natural materials like driftwood or Indian almond leaves, which gradually release tannins to lower pH over time. Peat moss in your filter can also soften and acidify the water slowly. Another effective option is using reverse osmosis (RO) water mixed with tap water to achieve a lower pH. Be sure to test the pH regularly with a reliable test kit, making small adjustments to avoid sudden changes, which can stress your fish.

How to Lower PH in Fish Tank

Causes of High pH in Fish Tanks

High pH in fish tanks can stem from several common factors, which, if unchecked, may lead to an alkaline environment unsuitable for most fish. Tap water is a primary cause; in many areas, tap water naturally has high pH due to dissolved minerals like calcium and magnesium. If used untreated in aquariums, it can gradually increase pH. Another contributing factor is substrate choice. Substrates like crushed coral, limestone, or shells release minerals that raise alkalinity, making them ideal for marine or African cichlid tanks but not for most freshwater tanks.

Decorations can also influence pH. Natural rocks, especially those containing calcium carbonate (like limestone), will release minerals into the water, raising pH over time. Finally, certain chemical additives and medications can alter water chemistry, sometimes raising pH. Understanding these causes can help aquarists prevent and manage high pH, creating a balanced, stable environment for their fish.

How to adjust aquarium pH

Adjusting aquarium pH requires careful, gradual methods to prevent stressing or harming your fish. First, test your tank’s pH using a reliable test kit to determine current levels. If the pH is too high, natural methods are often preferred for their gentle effect on water chemistry.

Adding driftwood is a common approach, as it releases tannins that gradually lower pH, creating a more acidic environment. Similarly, Indian almond leaves (catappa leaves) are beneficial; they release mild acids while providing anti-inflammatory benefits for fish. Peat moss is another option that, when placed in a filter bag within the tank or filter, can reduce pH over time through the release of humic acids.

For planted tanks, CO2 injection can help lower pH temporarily by creating carbonic acid as it dissolves, although this requires careful monitoring to avoid excess CO2. If natural methods aren’t effective enough, commercial pH reducers can be used, but these should be applied sparingly to prevent rapid pH shifts.

Always make changes gradually to avoid sudden pH fluctuations, testing regularly to maintain stability. Consistent maintenance and a balanced pH will help create a healthy, comfortable environment for your fish.

Testing Your Fish Tank pH

Consistently monitoring the pH in your fish tank is vital for maintaining a stable and healthy habitat for your fish. Regular testing allows you to spot any shifts in acidity or alkalinity before they impact fish health. A high-quality pH test kit—either liquid or digital—is recommended, as these are generally more accurate than pH test strips.

To test, simply collect a small water sample from your tank. If using a liquid test kit, add the provided reagent drops to the sample and compare the resulting color to the kit’s pH chart. For digital testers, simply place the probe in the water, and the digital display will show the pH level directly.

It’s wise to test pH weekly, especially if you have delicate fish species or recent tank changes. Regular testing helps detect any pH changes due to factors like new decor, substrate, or water additives, ensuring a safe, stable habitat for your fish.

How to Lower pH in aquariums

Lowering pH in aquariums is crucial for maintaining a healthy environment, especially if the pH has become too alkaline for your fish species. One of the safest ways to reduce pH is by adding driftwood. As driftwood decomposes, it releases tannins, which gradually lower pH while creating a natural-looking tank. Indian almond leaves are another option; these also release mild acids that gently reduce pH and can help improve fish health with their anti-inflammatory properties.

Peat moss is an effective pH-lowering agent as well. Placing it in a filter bag and adding it to the filter will allow it to release humic acids, softening water and reducing pH. For planted tanks, CO2 injection can be beneficial, as it creates carbonic acid in the water, temporarily lowering pH—ideal for tanks with fish and live plants that thrive in slightly acidic water.

If these natural methods aren’t enough, consider using commercial pH reducers sparingly, as they can cause sudden pH shifts that may stress fish. Make all changes slowly to avoid sudden fluctuations, testing the water frequently to ensure stability. With regular monitoring and adjustments, you can maintain a balanced, safe pH for your aquarium inhabitants.

How to raise pH in aquariums

Raising the pH in an aquarium is often necessary when water becomes too acidic for certain fish species. One effective natural method is to incorporate crushed coral or limestone into the substrate or filter. These materials release calcium carbonate, gradually increasing alkalinity and pH. Similarly, aragonite sand is ideal for saltwater and African cichlid tanks, as it slowly raises pH while buffering against future drops.

Another simple approach is using baking soda (sodium bicarbonate). Dissolve a small amount in dechlorinated water before adding it to the tank, as this will gently increase pH. However, only use baking soda as a short-term solution, as it lacks buffering properties.

Commercial pH-raising products are also available and can be effective, but should be used sparingly to avoid sudden shifts. Regularly test pH levels to maintain stability, adjusting gradually to keep the aquarium environment safe for your fish.

Acclimating New Fish

When introducing new fish to an aquarium, it’s essential to match the water conditions to their natural habitat, particularly the pH level. Lowering pH can be beneficial for certain species that thrive in more acidic water.

 To safely lower pH in your fish tank, start by adding driftwood or peat moss, both of which naturally release tannins that acidify the water. Indian almond leaves are another option that gradually softens and lowers pH. 

For a controlled approach, use pH-lowering products designed for aquariums, but add them gradually to avoid sudden changes. Always test the water frequently during acclimation, as rapid pH shifts can stress or harm fish. With careful management, you can create a stable, comfortable environment for new arrivals.

Filed Under: Essentials

Should I Use Hot or Cold Water in my Coffee Maker?

November 2, 2024 by bigfishtavernlagunaadmin Leave a Comment

Brewing the perfect cup of coffee involves more than just choosing quality beans and grinding them right. One of the most overlooked factors is the water you use. Many coffee enthusiasts wonder: should you use hot or cold water in your coffee maker? Here’s everything you need to know about how water temperature affects your coffee and the optimal way to use water for that perfect brew.

Should I Use Hot or Cold Water in my Coffee Maker?

Why Water Temperature Matters in Coffee Making

Water temperature plays a pivotal role in the art and science of coffee brewing. This often-overlooked element has a significant impact on the extraction process, affecting everything from taste and texture to the overall balance of flavors in your cup. Here’s a closer look at why water temperature matters in coffee making and how it can transform your coffee experience.

Too Hot: If the water is above the recommended range (usually 195°F to 205°F or 90°C – 96°C), it can lead to over-extraction, resulting in a bitter or burnt taste. Higher temperatures pull out more bitter compounds that overpower the coffee’s natural flavors.

Too Cold: Water below the optimal range may lead to under-extraction, which results in a sour, acidic, or weak flavor. This happens because colder water doesn’t dissolve coffee solids as effectively, leaving the cup unbalanced.

By maintaining the correct water temperature, you ensure that only the desirable compounds are extracted, leading to a well-rounded and flavorful brew.

What are the Chemical Differences Between Hot and Cold Brew Coffee?

Hot and cold brew coffee differ chemically due to variations in extraction temperatures and times. Hot brew coffee, typically brewed at temperatures around 90°C, extracts more acidic compounds and antioxidant substances, resulting in higher acidity and stronger antioxidant activity compared to cold brew.

Cold brew, often brewed at about 4-20°C for 12-24 hours, has lower acidity and antioxidant levels, yielding a smoother, less acidic flavor profile . Furthermore, hot brewing extracts more non-volatile compounds like certain acids and polyphenols, enhancing the coffee’s complexity and bitterness, while cold brewing often results in a sweeter, more floral profile due to differences in aromatic compound extraction .

Additionally, the cold method tends to preserve certain delicate compounds, offering a distinct profile appealing to different consumer preferences .

Should I Use Hot or Cold Water in my Coffee Maker?

For most coffee makers, you should start with cold, filtered water. Coffee makers are designed to heat water to the optimal brewing temperature, usually around 195-205°F (90-96°C), which is ideal for extracting the best flavors from the coffee grounds. Using hot water from the tap can introduce impurities from water heaters or pipes that may affect the taste, while cold water ensures that the coffee maker heats the water gradually to reach the right brewing temperature.

Using hot tap water may also result in uneven brewing if the machine cannot maintain a consistent temperature. The gradual heating process provided by cold water helps extract a balanced mix of oils, acids, and other flavor compounds, producing a rich and well-rounded cup. So, starting with cold water allows your coffee maker to do its job and produce the best flavor possible from your coffee grounds.

Mineral Content and Water Quality: Choosing the Best Water

In addition to temperature, water quality also affects coffee taste. Water that is too hard (with high mineral content) can create an off taste, while overly soft water may fail to extract enough flavor from the grounds. Experts recommend using filtered water with a balanced mineral content, which helps achieve the right extraction level. Many coffee aficionados recommend bottled or filtered tap water rather than distilled water since some minerals are essential for bringing out coffee’s flavor.

The mineral balance in cold water is usually ideal for coffee makers as hot tap water can contain impurities picked up from pipes or water heaters. Therefore, cold filtered water or bottled water with moderate mineral content often works best.

How to Use Hot or Cold Water with Manual Brewing Methods

When it comes to manual brewing methods, like pour-over, French press, or AeroPress, you have more flexibility but also greater control over the temperature. Here’s how to approach water temperature for different manual methods:

  • Pour-Over: For pour-over coffee, using water between 195°F and 205°F is ideal. You can start with hot water to directly control this temperature, as cold water wouldn’t be possible without a heating step.
  • French Press: For a French press, slightly lower temperatures, around 195°F, are preferred to avoid over-extraction. Starting with hot water gives you the control needed to keep within this range.
  • AeroPress: AeroPress allows for experimentation, with users trying both lower and higher water temperatures. Typically, a range of 175°F to 205°F works well, depending on your taste preferences.

In each of these methods, pre-heating the water is key for flavor extraction and consistency. Cold water isn’t practical for these methods since you need hot water to brew the coffee properly.

Practical Tips for Brewing Better Coffee

Whether you’re using a drip coffee maker or a manual method, following a few practical tips will help you maximize flavor:

  1. Start with Cold, Filtered Water for Drip Machines: Use cold, filtered water to avoid unwanted minerals and let your coffee machine control the temperature.
  2. Use Fresh, Quality Coffee Grounds: The freshness of your coffee grounds also affects taste. For the best aroma and flavor, grind your coffee right before brewing.
  3. Measure Water and Coffee Precisely: Achieving the ideal coffee-to-water ratio, around 1:15 or 1:16 for most drip and manual methods, helps with balanced extraction.
  4. Preheat Water for Manual Brewing: For pour-over, French press, and AeroPress, heat water to the correct range before pouring it over the grounds.
  5. Experiment with Water Temperatures for Specialty Brews: Try adjusting water temperature slightly with manual methods to find your preferred flavor profile, especially with different coffee beans.

Should I use hot or cold water in my coffee maker?  If you are using tap water, be sure to use cold water. Avoid hot water.

Filed Under: Essentials

Does a Cheap Coffee Maker Make Bad Coffee? Key Insights

November 2, 2024 by bigfishtavernlagunaadmin Leave a Comment

Many people think, Does a cheap coffee maker make bad coffee? The answer might surprise you. While inexpensive machines lack some of the advanced features of high-end models, they can still produce a satisfying cup with the right approach. By focusing on quality beans, water, and a few simple brewing techniques, even budget coffee makers are capable of delivering delicious, aromatic coffee.

What You’ll Learn

This guide will examine the differences between cheap and expensive coffee makers, analyze the factors that impact coffee quality, and offer tips to make the best coffee, regardless of your machine’s price tag. We’ll also consider whether it’s worth investing in a more expensive model or if a few smart techniques can make your budget-friendly machine a winner.

Does a Cheap Coffee Maker Make Bad Coffee?

The Differences Between Cheap and Expensive Coffee Makers

Choosing between a cheap and an expensive coffee maker can feel overwhelming, especially when you want a good cup without breaking the bank. However, understanding the differences in build, performance, and features can help clarify which type best suits your coffee needs.

Build Quality and Materials

Cheap Coffee Makers: Generally constructed from lightweight plastic, cheap coffee makers are less durable and prone to wear and tear. Their lightweight materials often mean less heat retention, which can affect brewing performance. Over time, they may be more susceptible to cracks, leaks, and other issues, making frequent replacement likely.

Expensive Coffee Makers: Premium coffee makers are typically crafted from stainless steel or high-quality, heat-resistant materials that enhance durability and heat retention. These machines are designed for longevity, offering a solid build that withstands daily use. This sturdier construction makes them a worthwhile investment for avid coffee drinkers.

Brewing Temperature and Control

Cheap Coffee Makers: Many budget models lack the ability to reach or maintain the optimal brewing temperature of 195°F–205°F, which is essential for extracting coffee’s full flavor. This lower or inconsistent temperature often results in coffee that tastes sour or weak, as the flavor compounds haven’t been fully extracted.
Expensive Coffee Makers: Higher-end machines are engineered to reach and hold consistent temperatures, ensuring a well-balanced, flavorful brew each time. Some offer precise temperature control settings, allowing users to experiment with different temperatures to bring out the best in each type of coffee bean.

Features and Customization Options

Cheap Coffee Makers: Basic models focus on simplicity, often offering limited settings or none at all. They usually come with one or two standard brewing options without customization, making them suitable for people who just want a quick, no-frills cup of coffee.

Expensive Coffee Makers: High-end machines come with multiple brewing options, like strength adjustments, pre-infusion (blooming), and programmable timers. These features allow for more control over the brewing process, giving enthusiasts the flexibility to tailor each cup to their liking. Some premium machines even have settings for different types of coffee drinks, like espresso or cold brew.

Water Distribution

Cheap Coffee Makers: Inexpensive coffee makers typically use a single stream of water that may not evenly saturate the coffee grounds, leading to inconsistent extraction and a less balanced flavor profile.

Expensive Coffee Makers: Premium models often feature a showerhead design that evenly distributes water over the coffee grounds, promoting uniform extraction and a fuller-bodied flavor. This even distribution ensures that all the coffee grounds are equally saturated, resulting in a more balanced and nuanced cup.

Does a cheap coffee maker make bad coffee?

No, A cheap coffee maker can produce good coffee, but there are several limitations related to the machine’s design and material quality that might impact the outcome:

Temperature Control

Consistent brewing temperature, typically between 195°F and 205°F, is crucial for optimal extraction. Cheap machines often lack precision in maintaining this temperature range, which can lead to under-extracted or over-extracted coffee, impacting flavor quality .

Durability and Component Quality

 Budget coffee makers often use lower-quality materials that may not handle repeated use effectively. Components such as plastic water reservoirs or metal heating elements may degrade over time, leading to inconsistent brewing and possible flavor contamination .

Limited Brewing Customization

Higher-end coffee makers usually offer customizable settings for grind size, water flow, and brew time, which can significantly improve coffee quality by tailoring extraction to bean type and personal taste. Low-cost machines often lack these options, limiting users to a one-size-fits-all approach .

How Can the Aroma and Taste of Coffee be Improved Regardless of the Coffee Maker’s Cost?

Improving the aroma and taste of coffee doesn’t always require an expensive coffee maker. With a few simple adjustments to technique and ingredients, you can significantly elevate the flavor profile of your coffee, regardless of the machine you’re using. Here’s how:

Use Fresh, High-Quality Beans

To maximize flavor and aroma, use fresh, whole coffee beans and grind them just before brewing. Once coffee is ground, it starts to lose its flavor, so it’s best to buy whole beans and grind them just before brewing. Opt for specialty-grade beans, as they generally provide richer, more complex flavors—Arabica beans, for instance, are known for their nuanced taste profiles compared to Robusta beans. Additionally, pay attention to the roast date; coffee usually peaks in freshness within two to four weeks of roasting.

Store Coffee Properly

Proper storage is essential to preserve the quality of coffee beans. Keep them in an airtight container, away from light, moisture, and heat, as oxygen and humidity can degrade the oils that give coffee its flavor. Avoid placing coffee in the refrigerator, as it easily absorbs odors from surrounding foods.Instead, maintain beans at room temperature in a cool, dark place to keep flavors intact.

Use Filtered Water

With water comprising over 98% of a cup of coffee, its quality is essential. Filtered water without strong mineral content, chlorine, or other impurities will help the coffee’s natural flavors shine through. For optimal coffee brewing, the water temperature should be between 195°F and 205°F (90°C–96°C). Too cool, and the coffee may taste sour; too hot, and it can taste bitter.

Adjust the Coffee-to-Water Ratio

Adjusting the coffee-to-water ratio is essential for controlling the strength and flavor of your brew. A good starting ratio is 1 to 2 tablespoons of coffee for every 6 ounces of water, though this can be adjusted to suit individual taste preferences For a stronger, bolder flavor, increase the coffee amount; for a milder brew, use less coffee. Experimenting helps find the perfect balance.

Grind Size and Consistency

Different Grind Sizes for Different Brewing Methods Each brewing method requires a specific grind size for optimal flavor. For example: 

  • Drip Coffee Makers: Use a medium grind for balanced extraction.
  • French Press: Coarse grind works best, allowing a longer, full-bodied brew.
  • Espresso: A fine grind is essential for rapid, intense extraction.

Using a burr grinder is recommended, as it produces uniform grind sizes that ensure even extraction and richer flavor. Unlike blade grinders, which often create inconsistent particles, burr grinders allow for precise control over grind size, enhancing taste and consistency.

Pre-Infuse or Bloom the Coffee Grounds

Pre-Infuse (Bloom) the Coffee Grounds To improve flavor, pre-infuse, or “bloom,” the coffee grounds by pouring a small amount of hot water over them and letting it sit for about 30 seconds before brewing. This step releases trapped gasses from fresh grounds, allowing better saturation and resulting in a smoother, more flavorful cup.

Advantages of a Cheap Coffee Maker

  • The biggest advantage of a cheap coffee maker is, of course, its price. These models are accessible and affordable, making it easier for anyone to brew coffee at home.
  • Inexpensive machines are ideal for people just starting with coffee or for those on a tight budget.
  • Cheap coffee makers often come with basic, straightforward functions. For those who prefer simplicity over complicated settings, a budget coffee maker can be the ideal choice.
  • These machines are often easier to clean, with fewer parts and fewer maintenance requirements.

Because they’re less expensive, you don’t have to worry too much about experimenting with a cheap coffee maker. If it doesn’t work out, the investment was minor compared to a high-end machine.

When to Consider Upgrading to a High-End Coffee Maker

While cheap coffee makers can get the job done, there are times when a high-end machine might be worth the investment. Here’s when upgrading could make sense:

  • If you value the same quality with every brew and don’t want to fuss with temperature or brewing times manually, a high-end coffee maker can provide consistency.
  • Expensive coffee makers come with more settings and customization options, allowing you to play around with different brewing techniques and flavors.

If you want a coffee maker that will last for years and withstand heavy use, investing in a quality machine can be a wise decision.In the long term, it could prove more cost-effective than constantly replacing less expensive models.

Final Thoughts: Does Price Really Matter?

The short answer is no—price alone doesn’t determine the quality of coffee. With a few simple tricks and a bit of attention to detail, a cheap coffee maker can still brew a great cup. While high-end coffee makers offer added convenience and control, they’re not a necessity for good coffee. Focus on your beans, grind, water quality, and ratios, and you can enjoy a delicious cup, even with a budget machine.

Filed Under: Essentials

How Much Should You Spend on a Coffee Maker? Cost Guide

November 1, 2024 by bigfishtavernlagunaadmin Leave a Comment

Ah, coffee! For many, it’s the lifeblood of the morning. Finding the right coffee maker can be difficult with such a wide range of options available.You may be wondering: How much should I really spend on a coffee maker? Are the pricey machines worth the investment, or can a budget option give you a satisfying morning brew? In this guide, We will give you a coffee maker price consideration, Prices vary based on type, we will also recommend which one will be the right choice for you as per your needs.

How much should you spend on a coffee maker?

How Much Should You Spend on a Coffee Maker?

The amount you spend on a coffee maker will depend on your coffee preferences and desired quality. Casual drinkers who just need a simple brew can opt for a basic drip or single-serve machine in the $500–$1,000 range. For those who enjoy daily coffee with more flavor control, mid-range models $1,000–$5,000 often offer features like temperature control and pre-infusion, enhancing taste and consistency.

Coffee enthusiasts or espresso lovers who want café-quality results may want to invest in high-end machines ($1000+), which offer precision and customization. Choose based on how often you’ll use it and the quality you prefer.

How Much Does a Coffee Maker Cost?

  • Basic Models: Entry-level drip coffee makers for simple brewing start around $20 to $50.
  • Mid-Range Models: Coffee makers with programmable features, temperature control, or single-serve options typically range from $100 to $300.
  • High-End Models: Advanced machines, including high-quality espresso makers and specialty brewers, can cost from $300 to several thousand dollars, depending on features and brand.

Coffee Maker for Home Use Cost

  • Casual coffee drinkers: A basic machine in the $500–$1,000 range may be enough.
  • Serious coffee lovers: A higher-end machine in the $1,000–$5,000 range may be worth it.
  • Affordability: A coffee maker under $100 may be a good choice if you’re looking for portability and simplicity.
  • Flavor: How particular you are about the flavor of your coffee can help you decide how much to spend.
  • Specific functions: If you want specific functions, like delayed brewing or small batch options, you may want to spend more.

Coffee Maker for Home Use Cost

Business environments demand coffee makers with higher capacity and durability:

  • Office and Small Business: A commercial-grade drip or single-serve machine ($300-$800) is suitable for moderate daily use.
  • Cafés and High-Traffic Businesses: For settings that require large volumes or specialty drinks, such as cafés, a commercial espresso machine or high-capacity brewer ($1,000-$5,000+) is necessary for speed, consistency, and durability.

Key Considerations

Coffee Quality & Brewing Preferences

When choosing a coffee maker, both coffee quality and brewing preferences are essential factors to consider, as they greatly influence the price and features needed to achieve an ideal brew. Basic coffee makers, typically in the $20-$50 range, serve the purpose of straightforward brewing without many added features. These models are suitable for those who are looking for convenience and simplicity, and they can brew a decent cup. However, basic models often lack features that can dramatically improve coffee quality, such as temperature control, pre-infusion, and manual pour-over options, all of which allow better extraction and balance in flavor.

For coffee lovers seeking richer, more complex flavors, a mid-range coffee maker ($100-$300) may be a worthwhile investment, as these models often include adjustable settings and improved build quality. High-end coffee makers ($300+) go further, offering high precision in temperature, brewing time, and specialized modes, making them perfect for users who value café-level quality at home.

Frequency of use also affects this decision

Daily users, especially those who brew multiple cups, may benefit from a more durable, well-built coffee maker from a reputable brand ($100+). While these may cost more initially, the investment can be cost-effective in the long run, as cheaper machines often need frequent replacement.

Type of Coffee Maker: Prices Based on Type

When selecting a coffee maker, understanding how different types affect price and functionality can help you choose one that fits your needs and budget.

Drip coffee makers

Drip coffee makers are affordable and versatile, typically costing between $20 and $200. Basic models offer simple brewing for larger quantities, while premium versions feature programmable options and improved extraction technology for better flavor.

Single-serve machines

Single-serve machines, popular for convenience, cost between $50 and $200. These are ideal for those who enjoy single-cup servings with a variety of flavors, as many models are compatible with coffee pods and capsules.

Espresso machines

Espresso machines have the widest price range, from around $100 to several thousand dollars, depending on whether they are manual, semi-automatic, or fully automatic, with high-end models offering extensive customization and café-quality results.

Recommendation

For most people, a good drip coffee maker in the $100-$200 range offers a balance between quality and durability. However, if you prioritize premium espresso or customizable brewing options, consider spending more.

How much should you spend on a coffee maker? For most people, a good drip coffee maker in the $100-$200 range offers a balance between quality and durability.

Filed Under: Essentials

How Many Years Should a Coffee Maker Last? Lifespan Guide

November 1, 2024 by bigfishtavernlagunaadmin Leave a Comment

Coffee makers are an essential part of many kitchens, transforming mornings with the rich aroma of freshly brewed coffee. While these machines are trusted daily by coffee lovers everywhere, one question frequently arises: How many years should a coffee maker last? Here, we’ll break down the typical lifespan of various coffee maker types, factors that influence longevity, and valuable tips for getting the most out of your machine.

How Many Years Should a Coffee Maker Last?

How Many Years Should a Coffee Maker Last? Average Lifespan

The average lifespan of a coffee maker generally spans 5 to 10 years, influenced by factors like quality, frequency of use, and maintenance practices. Higher-end models, especially those made with durable materials like stainless steel, often last longer than basic models, especially if they are regularly maintained. For coffee makers used daily, parts like the heating element, pump, and seals may wear out more quickly, while machines used less frequently might last closer to a decade.

Maintenance also plays a key role; regular cleaning and descaling every 1-3 months can prevent mineral buildup, extending the coffee maker’s functionality. Over time, mineral deposits from water can clog internal components, impacting performance and potentially shortening the machine’s lifespan. Ultimately, choosing a well-built machine and caring for it properly can maximize its lifespan, making it a reliable part of your kitchen for years.

Different types of coffee makers Lifespan

Different types of coffee makers have unique lifespans, largely due to design, usage, and maintenance needs. Here’s a breakdown:

Drip Coffee Makers: Typically last about 5 to 7 years. These machines have simple components but may experience issues with the heating element or water pump over time, especially if not regularly descaled.

Single-Serve Machines (e.g., Keurig): Generally last around 3 to 5 years. These machines have complex, small parts that wear out more quickly with frequent use, particularly if users don’t perform regular cleaning.

Espresso Machines: High-end espresso machines can last 7 to 10 years or more. Quality machines with metal components and removable parts for maintenance are especially durable, while basic models may last closer to 5 years.

French Press and Pour-Over: These manual coffee makers are non-electric and have few parts, so they can last indefinitely with minimal care.

Regular maintenance, cleaning, and part replacement (if available) are key to maximizing the lifespan of each type.

Factors Affecting the Lifespan of a Coffee Maker

How Many Years Should a Coffee Maker Last?

The lifespan of a coffee maker is shaped by several factors, which include:

Quality of Materials and Components: Coffee makers built with high-quality materials, like stainless steel and durable heating elements, tend to last longer than those made with cheaper plastic parts. Brands focused on quality often produce machines that withstand wear and tear more effectively.

Frequency of Use: Coffee makers used multiple times per day experience more wear on parts like pumps and heating elements. Machines used only occasionally will generally last longer, as frequent use accelerates the breakdown of essential components.

Maintenance Practices: Routine cleaning and descaling are essential to prevent mineral buildup, which can clog and damage internal parts. Descaling every 1-3 months helps maintain optimal function and reduces strain on the machine, thus extending its life.

Type of Coffee Maker: Lifespan varies by type. Manual options like French presses can last indefinitely, while electric drip and single-serve machines may last 5-7 years. Espresso machines, especially high-end models, can last a decade or longer with proper care.

Availability of Replacement Parts: Machines with accessible, replaceable parts (such as pumps and gaskets) offer more opportunities for repair, extending their usable life compared to models without replaceable components.

Common Failure Points in Coffee Makers

Coffee makers, like any appliance, have common points of failure that can affect their performance and lifespan. Some of the most common issues include:

Heating Element: The heating element, responsible for warming the water to brew coffee, is one of the most common points of failure. Over time, mineral buildup or electrical issues can reduce its effectiveness, causing the machine to brew lukewarm coffee or stop heating altogether.

Water Pump: A pump is used in many coffee makers to push water through the coffee grounds. Pumps can wear out or clog, especially if the machine is used daily or if hard water is used. A failing pump often leads to slow brewing times or, in some cases, prevents brewing entirely.

Seals and Gaskets:Rubber seals and gaskets help prevent water leaks within the machine. Over time, these components can dry out, crack, or lose flexibility, leading to leaks or pressure loss, especially in espresso machines.

Control Board and Sensors: Modern coffee makers with electronic controls may experience issues with the control board or sensors. Power surges, moisture, or age can cause electronic components to malfunction, preventing the coffee maker from starting or operating correctly.

Clogs and Mineral Buildup: Mineral deposits from hard water can clog internal tubing and nozzles, obstructing water flow. Regular descaling can prevent clogs, but neglecting maintenance can lead to serious clogs that damage the machine’s internals.

Carafe or Pot Breakage: In drip machines, the glass carafe or pot can easily break, especially if dropped or exposed to temperature extremes. 

Addressing these common failure points with regular maintenance, using filtered water, and handling with care can help prolong the life of a coffee maker.

Design and Material Quality: Key to Longevity in Coffee Makers

How Many Years Should a Coffee Maker Last?

Design and material quality play crucial roles in the longevity of coffee makers. Machines made with high-quality materials, like stainless steel, brass, and durable plastic, generally last longer than those built with cheaper materials.

 High-end coffee makers often feature robust heating elements and sturdy pumps that can handle daily use, while budget models may use components prone to wear. Additionally, coffee makers designed for easy disassembly allow for straightforward cleaning and repairs, extending their usable life.

 Design features like replaceable seals and accessible internal parts make maintenance simpler, helping prevent common issues like leaks or clogs. Overall, a well-designed coffee maker with quality materials offers better durability, making it a worthwhile investment for long-term use.

Signs It’s Time to Replace Your Coffee Maker

Key signs that it may be time to replace your coffee maker include:

Reduced Coffee Quality: If your coffee tastes weak, bitter, or inconsistent despite using the same beans and grind, it could indicate that the heating element or other internal parts are failing.

Slower Brewing Time: A significant increase in brewing time often signals internal clogs or a failing pump, especially if descaling doesn’t resolve the issue.

Lukewarm Coffee: Coffee makers that no longer reach optimal brewing temperature (195°F to 205°F) produce subpar coffee. This issue usually points to a failing heating element.

Frequent Breakdowns: If you’re frequently dealing with leaks, clogs, or other malfunctions, it may be more economical to replace the coffee maker than to continue repairs.

Unusual Noises or Smells: Loud grinding or hissing sounds, as well as burnt smells, can signal electrical issues or internal damage, indicating it’s time for a new machine.

Recognizing these signs can help you determine when it’s time to upgrade for better performance and reliability.

How Many Years Should a Coffee Maker Last?

Maintenance Tips for Extending a Coffee Maker’s Lifespan

  • Clean Daily: Rinse the carafe and filter basket after each use.
  • Deep Clean Weekly: Wash all removable parts with warm, soapy water.
  • Descale Regularly: Run a descaling cycle every 1-3 months with vinegar or a descaling solution.
  • Use Filtered Water: Prevents mineral buildup and improves flavor.
  • Replace Worn Parts: Change water filters and rubber gaskets as needed.
  • Store Dry: Empty and dry the machine fully before long-term storage.

Is an Extended Warranty Worth It?

Extended warranties on coffee makers can be worth considering, particularly if you’re investing in a higher-end model. Since the cost of repair for electronic components can be high, a warranty may offer peace of mind and cover repairs if your machine has a mechanical issue within the warranty period.

Summary

A well-maintained coffee maker can last beyond its average lifespan of 5 to 10 years, providing fresh coffee every morning. By choosing a machine suited to your needs, committing to regular cleaning and descaling, and staying mindful of potential points of failure, you can help your coffee maker serve you for years to come

    Filed Under: Essentials

    Where Can You Put Vending Machines? Top 10 Locations

    October 31, 2024 by bigfishtavernlagunaadmin Leave a Comment

    When it comes to starting or expanding a vending machine business, the most crucial question isn’t about the products or the machine type—it’s about location. Even the best-stocked vending machines can go unnoticed if placed in the wrong spot. So, where can you put vending machines to make the most of your investment? In this guide, we’ll cover some of the best and most profitable places to place vending machines, strategies for choosing ideal locations, and tips for securing those spots. By the end, you’ll have a detailed blueprint for vending machine success that goes beyond the typical answers, giving you a competitive edge.

    Where can you put vending machines

    Why Choosing the Right Location is Critical for Vending Success

    The vending machine business is all about foot traffic and convenience. The more people that walk by a vending machine, the higher the chance someone will buy something. But it’s not just about high traffic; it’s about understanding the habits of the people in these areas. Are they looking for a snack on a quick break? Or a refreshing drink after a workout? The better the location fits the needs of its audience, the more successful your vending machine will be.

    Top 10 Locations for Vending Machines

    Let’s take a closer look at some of the most profitable and practical places to put vending machines, as well as a few creative options you might not have considered.

    1. Office Buildings

    Office buildings are one of the best spots for vending machines, and it’s no wonder why. Workers often don’t have time to leave the building to grab snacks or drinks, especially when they’re on tight schedules. By placing a vending machine in a lobby, break room, or common area, you’re creating a convenient option for employees who want to grab a quick snack or beverage during their workday.

    Best Products: Coffee, energy drinks, snacks, quick meal options

    Tip: Talk to building managers about peak hours and preferred snack types among employees.

    2. Hospitals and Healthcare Facilities

    Healthcare facilities are packed with potential customers, including patients, visitors, and staff. Hospitals run around the clock, meaning there’s demand for snacks and drinks at all hours. Most cafeterias in hospitals have limited hours, so a vending machine offers a reliable, anytime option.

    Best Products: Water, juices, healthy snacks, and some comfort food

    Tip: Prioritize healthier options, as many visitors may be conscious of nutritional needs.

    3. Schools and Universities

    From high schools to college campuses, educational institutions are prime vending machine locations. Students are often on the move, needing quick energy boosts between classes, and they may not have time to go off-campus for food.

    Best Products: Affordable snacks, energy bars, bottled water, and drinks

    Tip: Ensure the products align with school guidelines, especially for K-12 schools, which often have restrictions on sugary snacks and sodas.

    4. Gyms and Fitness Centers

    People heading to or from the gym frequently need hydration and a quick protein fix. By placing a vending machine near the entrance or in the locker room area, you’re giving gym-goers a convenient way to grab what they need before or after their workout.

    Best Products: Sports drinks, protein bars, bottled water, and pre/post-workout snacks

    Tip: Research high-protein and low-sugar options, as they’re popular among fitness enthusiasts.

    5. Hotels and Motels

    For travelers arriving late or those who don’t want to pay for pricey room service, a vending machine can be a lifesaver. Hotels often have vending machines near lobbies or elevator areas to provide guests with convenient snack and drink options.

    Best Products: Bottled water, chips, candy, instant coffee, and travel-sized essentials

    Tip: Include small toiletry items like toothpaste or travel-size mouthwash. These are helpful for guests who may have forgotten something.

    6. Malls and Shopping Centers

    Shoppers need snacks and drinks while they browse, especially if they’re spending long hours in a mall. Vending machines placed in strategic locations around shopping centers can draw significant foot traffic, particularly on weekends and holidays.

    Best Products: Cold drinks, snacks, candy bars, and coffee

    Tip: Place the vending machine near entrances, seating areas, or restrooms for maximum visibility.

    Where can you put vending machines

    7. Public Transit Stations (Train, Bus, and Subway)

    Commuters are always in a hurry, and many don’t have time to grab a snack or coffee before boarding. Transit stations offer a unique opportunity as people are often waiting, looking for something to occupy their time.

    Best Products: Coffee, energy drinks, bottled water, and snacks

    Tip: Consider offering easy-to-carry items that commuters can take on the go.

    8. Apartment Complexes

    Apartment complexes with several buildings and a large number of residents are ideal locations for vending machines. People living in these complexes may not want to make a grocery store run for a quick snack or drink, especially in the evenings.

    Best Products: Bottled water, frozen meals, snacks, and basic hygiene products

    Tip: Partner with the complex management and choose a spot near laundry rooms or community areas.

    9. Amusement Parks and Entertainment Venues

    Amusement parks, movie theaters, and entertainment venues are all ideal for vending machines because people are already spending money on experiences. A quick snack or drink is an easy purchase for someone in these locations.

    Best Products: Water, soft drinks, snacks, and novelty items like light-up toys

    Tip: Offer a variety of snacks, including kid-friendly and family-oriented options.

    10. Factories and Manufacturing Plants

    Factories and manufacturing plants are often bustling with employees who work long shifts and don’t have easy access to snacks or drinks. These locations are excellent for vending machines, especially in break rooms.

    Best Products: Coffee, energy drinks, affordable snacks, and quick meal options

    Tip: Research popular snack preferences for factory employees to ensure your vending options meet demand.

    Key Considerations for Placement

    When selecting a location for vending machines, several factors are crucial to maximizing usage, meeting customer needs, and driving revenue. 

    Foot Traffic

    Foot Traffic is one of the primary considerations. Placing vending machines in high-traffic areas such as office lobbies, train stations, airports, or busy shopping malls greatly increases their visibility and usage, as they are more likely to attract passersby looking for quick refreshments or essential items.

    Accessibility

    Accessibility is equally important, as vending machines should be placed in easily reachable spots, particularly where people are likely to linger or wait, such as break rooms, waiting areas, or main corridors. Easy access ensures convenience for users, encouraging spontaneous purchases and higher turnover.

    Demographic Needs

    Demographic Needs should also guide product selection for each location. For example, healthy snacks are well-suited for gyms, while a mix of snacks and drinks is appropriate for schools or college campuses. By catering to the specific demands of the target audience, vending machines can effectively meet user needs while generating significant revenue over time.

    Where can you put vending machines

    Additional Tips for Choosing Vending Machine Locations

    Choosing a location goes beyond just foot traffic. Here are some essential tips to help you make the best choice:

    • Understand Your Audience: Knowing the typical demographic of a location helps in selecting the right products. For instance, health-conscious products may work better in a gym than in a high school.
    • Evaluate Traffic Patterns: Some locations might have peak times (e.g., gyms in the morning and evening, office buildings around lunchtime). Make sure to stock up before busy times.
    • Talk to Management: Partner with facility managers to understand customer needs and secure the best spots within the building or area.
    • Consider Security: Make sure the area is well-lit and monitored, as vandalism can be an issue with some vending locations.
    • Regular Maintenance and Stocking: Even the best location won’t succeed if the vending machine isn’t regularly stocked and maintained. Empty or out-of-order machines quickly lose customers’ trust.

    Filed Under: Essentials

    How Much is a Vending Machine Permit? Costs by State

    October 31, 2024 by bigfishtavernlagunaadmin Leave a Comment

    Starting a vending machine business can be lucrative and relatively low-maintenance, but before setting up shop, you’ll need to secure a vending machine permit. Whether you’re new to the industry or expanding, understanding the costs and steps involved is essential for legal compliance. So, how much is a vending machine permit, and what are the exact steps to obtain one?

    In this article we will discuss the steps in detail and also discuss the Types of Fees and Average Costs, Renewals and Compliance, the type of problems you may have if you don’t have a permit, let’s get started.

    How Much is a Vending Machine Permit

    What is a Vending Machine Permit? And Why is it Necessary

    A vending machine permit is a license required by local or state authorities for the legal operation of vending machines in public or private locations. This permit is often necessary, particularly for machines selling food or beverages, to ensure compliance with public health and safety standards.

    By requiring permits, local governments can monitor vending machines to protect consumers from potential health risks, such as expired or unsanitary products, and to regulate the businesses operating them. The permit process often includes inspections and may involve an annual fee. Having a vending machine permit not only helps business owners avoid fines or legal issues but also reassures customers of the machine’s compliance with safety and hygiene regulations.

    Research Local and State Requirements

    The cost of a vending machine permit can vary widely depending on local and state regulations. To determine specific permit fees, it’s essential to Research Local and State Requirements. Here are the main steps to consider:

    Contact Local Authorities: Start by reaching out to your city or county clerk’s office, as most vending machine permits are regulated at the local level. In some cities, the cost may range from $10 to $250 per machine annually, depending on factors such as machine type (e.g., food, beverage, or other items), location, and the number of machines operated.

    State Health Department: If your machines sell perishable items, your state health department may require an additional food handling permit or inspection, which could add extra costs. States typically charge an annual fee for food-based vending permits, often ranging from $50 to $200.

    Additional Compliance Fees: Some states may also require sales tax permits or business licenses, with fees depending on the total revenue or location specifics.

    Types of Fees and Average Costs

    The cost of a vending machine permit can vary based on location, type of product dispensed, and other local requirements. Here’s an overview based on Types of Fees and Average Costs:

    How Much is a Vending Machine Permit
    • General Business License Fees: Many cities require a general business license for vending machine operators, which typically ranges from $50 to $150 annually. This fee may be affected by the size or scale of the operation.
    • Vending Machine Permit Fees: A specific vending permit for each machine might cost between $10 and $250 per machine annually, depending on the type of products sold and location. Public locations or high-traffic areas may carry higher fees.
    • Health and Safety Inspection Fees: For machines dispensing perishable food or beverages, additional health department inspections and permits may cost from $50 to $200 annually. These fees ensure the machine meets local health standards and safety codes.
    • Sales Tax Permit Fees: States that impose sales tax may require a sales tax permit or license. While this fee can vary, it’s often a one-time cost between $20 and $100. However, operators are responsible for remitting sales tax on all items sold.
    • Fire Department Permit Fees: In some regions, vending machines located in enclosed or high-traffic areas need fire safety compliance approval, costing approximately $50 to $150 depending on local fire code requirements.
    • Additional Location-Based Fees: Special fees may apply for vending machines in government buildings, schools, or other regulated areas, with costs that can range from $25 to $100 based on location-specific policies.

    By understanding these fees, vending machine operators can better prepare for the startup and ongoing costs of maintaining legal compliance.

    Steps to Obtain a Vending Machine Permit

    1. Visit your local city or county website to find specific permit requirements.Some states have online portals where you can apply for vending licenses directly.

    2. This is typically the first step to legitimize any business. Your local city hall or municipal office can help guide you through the process.  Fees are often based on the size and type of your business.

    3. If you’re selling food or beverages, visit the health department’s website to apply for the necessary permits. You may need to schedule an inspection to ensure the machine complies with health codes.

    4. Register with your state’s tax department if sales tax applies to vending machine products in your area. Many states offer online portals to simplify the process.

    5. Contact the zoning board if you’re planning to place your machine in a specific location, such as near schools or parks, which may have additional restrictions.

    State Permit for Machine Vending

    State Licensing for Machine Vending involves obtaining specific licenses and permits that allow vending machine operators to legally conduct business within a state.To get a vending machine permit in Texas, California, and Florida, follow these key steps:

    Texas

    • Register for a Sales Tax Permit with the Texas Comptroller (required for all machines).
    • Obtain a Health Permit from local health departments for food/drink machines.
    • Check local City or County Business Licensing requirements.
    • In Texas, a vending machine permit costs approximately $15 per machine annuall.

    California

    • Enroll to obtain a Seller’s Permit with the California Department of Tax and Fee Administration.
    • Apply for a Health Permit for food/beverage machines through county health departments.
    • Secure a Local Business License for each operating city/county.
    • Cities or counties may charge their own licensing fees, ranging from $50 to $100 per machine annually.

    Florida

    • Register for a Sales Tax Permit via the Florida Department of Revenue.
    • Acquire a Health Permit from the Florida Department of Agriculture for operating food vending machines.
    • Check for Local Licensing requirements based on machine locations.
    • Operators must register with the state and pay a $30 fee per machine each year.

    Renewals and Compliance

    The cost of a vending machine permit typically includes Annual Renewal Fees that vary by location, machine type, and product offerings. Here’s an outline of what to expect:

    How Much is a Vending Machine Permit

    Basic Renewal Fees: Many cities or counties charge between $10 and $250 annually per machine for renewal. The amount depends on factors like location, machine type, and whether it’s on public or private property.

    Food and Beverage Machine Renewals: Machines dispensing perishable items often incur higher renewal fees to cover regular health inspections, ranging from $50 to $200 annually. This ensures compliance with local health standards.

    Additional Compliance Fees: Some locations add extra renewal costs for safety compliance (e.g., fire department requirements), which may add $50 to $150 to the annual fees.

    Sales Tax Reporting Fees: If applicable, states may charge a small annual fee for sales tax reporting or require periodic filings, though these costs vary by jurisdiction.

    Start Your Business with Confidence

    If you have a vending machine permit, you’re already on the right path to starting your business with confidence. A permit is not only a legal requirement but also a powerful first step that shows your commitment to operating within regulations, which can enhance trust with property managers, customers, and regulators alike. Here’s how you can confidently launch and grow your vending machine business now that you have this key document in place:

    Target High-Traffic Locations: Use your permit to secure prime locations like schools, malls, or offices, maximizing foot traffic and potential sales.

    Choose In-Demand Products: Stock items based on location demand and permit regulations, selecting popular snacks, drinks, or healthy options.

    Regular Maintenance: Maintain machines by keeping them clean, well-stocked, and in working order to boost customer satisfaction and strengthen business reputation.

    Effective Promotion: Use local advertising and social media to attract attention to your machines, increasing engagement and sales.

    Expand Strategically: Leverage performance data to identify new locations, add machines, or introduce digital payment options.

    Build a Growth Plan: Use your permit as a foundation to expand confidently, scaling locations and product offerings as demand grows.

    Filed Under: Essentials

    • « Go to Previous Page
    • Page 1
    • Page 2
    • Page 3
    • Page 4
    • Page 5
    • Interim pages omitted …
    • Page 8
    • Go to Next Page »

    Primary Sidebar

    Recent Posts

    • Can You Deep Fry in a Nonstick Pan? My Surprising Results
    • Clay Pot vs Dutch Oven: Which One Right for You?
    • Are Dutch Ovens Non Toxic? All You Need to Know
    • Is Low Specific Heat Capacity Good for Frying Pans​
    • Smeg Kettle vs Mini Kettle: Which One Fits Your Style?

    Copyright © 2024 bigfishtavernlaguna.com. All right reserved.