• Skip to primary navigation
  • Skip to main content
  • Skip to primary sidebar
  • About Us
  • Affiliate Disclosure
  • Contact us
  • Cookie Privacy Policy
  • Privacy Policy
  • Sample Page
  • Terms of Use

Kitchen Guide

  • Appliance Reviews
  • Bakeware
  • Buying Guides
  • Product Comparisons
  • Recipes
  • Essentials
  • Cleaning

Essentials

Can You Swim with a Pool Vacuum? Safety Tips

June 15, 2024 by bigfishtavernlagunaadmin Leave a Comment

Maintaining a clean and inviting pool requires the use of a pool vacuum, an essential tool for the job.However, a common question among pool owners is whether it is safe to swim with a pool vacuum in the water. While pool vacuums are designed to efficiently remove debris and algae, their operation involves moving parts and electrical components that could pose safety risks. This article will discuss the safety considerations, guidelines, and best practices to ensure that swimming with a pool vacuum in the pool does not compromise the safety of swimmers. Understanding these aspects is crucial for a safe and enjoyable swimming experience.

Can You Swim With a Pool Vacuum

Understanding Pool Vacuums

What Are Pool Vacuums?

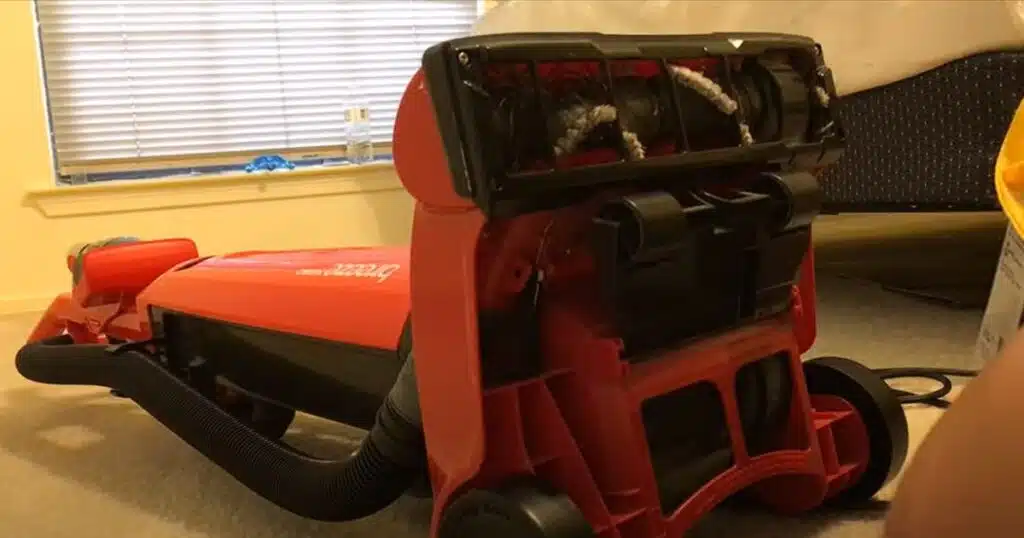
Pool vacuums are specialized devices crafted to maintain the cleanliness of swimming pools. Available in diverse types, each offers distinct operational methods and benefits. Crucial for pool upkeep, these vacuums efficiently eliminate dirt, leaves, and debris from pool bottoms, ensuring a pristine swimming environment. By suctioning up unwanted materials, they contribute to maintaining the pool’s clarity and appeal. In essence, pool vacuums are indispensable tools for pool owners, facilitating not only cleanliness but also enhancing the overall swimming experience.

Types of Pool Vacuums

There are three primary types of pool vacuums: suction-side, pressure-side, and robotic:

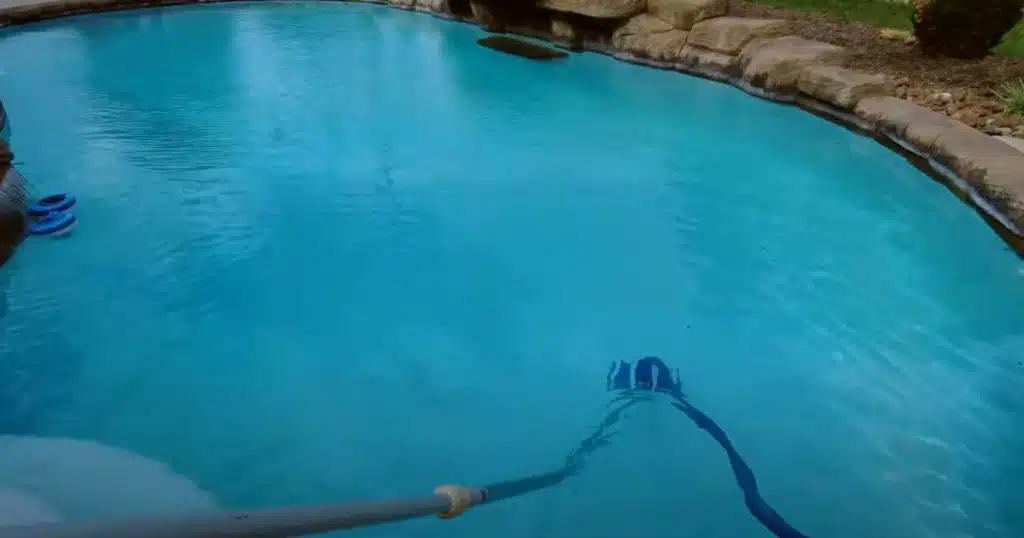
Suction-side Pool Vacuums: Suction-side pool vacuums function by harnessing the suction power produced by the pool’s filtration system. They utilize the suction power from the pool pump to navigate the pool and gather debris.

Pressure-side Pool Vacuums: Pressure-side pool vacuums are another type of pool cleaning device that connects to the return jet of a pool’s filtration system. They harness the water pressure returning to the pool to propel themselves and collect debris.

Robotic Pool Vacuums: Robotic pool vacuums are self-contained units. They operate autonomously, separate from the pool’s filtration system, utilizing built-in motors and sensors to clean the pool effectively. They use built-in motors and sensors to navigate the pool and clean efficiently. Each type of pool vacuum has its own set of benefits and considerations, so it’s essential to choose the one that is best.

How do Pool vacuum Cleaners Work?

Pool vacuum cleaners efficiently maintain the cleanliness of swimming pools by utilizing suction to remove debris and algae. These cleaners create suction power by linking to either the pool’s filtration system or a separate pump. Equipped with brushes or scrubbers, they navigate the pool floor and walls, dislodging dirt and grime. Debris is drawn into the cleaner’s filtration system, where larger particles are captured in a mesh bag or filter basket, and smaller ones are filtered out by the pool’s system. Then, the filtered water is sent back into the pool. Regular maintenance, including emptying the debris from the filter or bag, ensures continuous effectiveness. Pool vacuum cleaners are crucial devices for maintaining a clean and welcoming swimming environment.

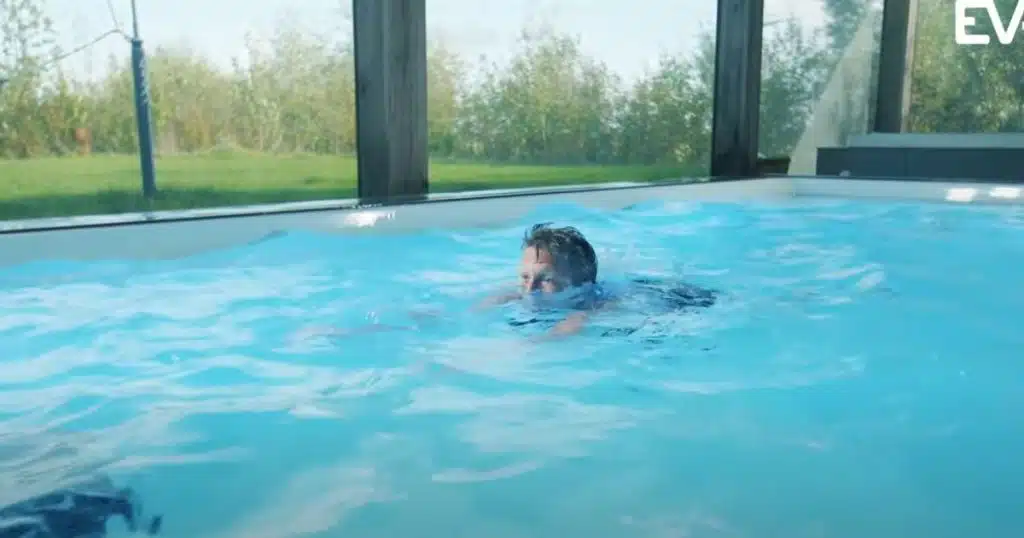
Swimming with a Pool Vacuum: Is it Safe?

Many wonder if it’s safe to take a dip while the pool vacuum is doing its job. Generally, swimming alongside a functioning pool vacuum is safe, but caution is key. Keep an eye on the vacuum’s operation, ensuring it’s not malfunctioning. By adhering to these precautions, swimming while the pool vacuum is running can be both safe and enjoyable.

Swimming alongside a pool vacuum may seem harmless, but there are potential risks and concerns to consider:

Entanglement Hazards: The suction force of some pool vacuums can pose a risk of entanglement, especially if the vacuum head or hose comes into contact with swimmers.

Electrical Hazards: Improper installation or maintenance of the pool vacuum can lead to electrical dangers, like electric shock, especially if electrical parts are exposed to water.

Can You Swim With a Pool Vacuum

Chemical Exposure: Pool vacuums frequently encounter pool chemicals, potentially causing skin irritation or breathing problems if mishandled.Swimmers may also inadvertently come into contact with these chemicals while swimming with the vacuum.

Physical Strain: Swimming with a pool vacuum can be physically demanding, especially if the vacuum is heavy or if the swimmer is not accustomed to swimming with added resistance.

Understanding these potential risks is crucial, and it’s important to take necessary precautions to ensure a safe swimming experience when using a pool vacuum. Always follow manufacturer instructions, regularly inspect and maintain the vacuum, and supervise swimmers, especially children, when the vacuum is in use.

Precautions for Swimming with a Pool Vacuum

  • Turn off the vacuum before swimming to prevent entanglement or injury.
  • Inspect the hose for damage to avoid water leakage or suction issues.
  • Secure the vacuum head tightly to the pole to prevent dislodgement.
  • Keep a distance from the vacuum to avoid accidental contact.
  • Supervise children and pets to ensure they stay away from the vacuum.
  • Educate all pool users about safety precautions regarding the vacuum.
  • Remain vigilant and mindful of potential dangers while swimming.

Factors to Consider to swim with a pool vacuum

Swimming with a pool vacuum can be fun, but it’s important to think about a few things before jumping in. Here are some factors to consider:

Pool Vacuum Design and Safety Features: Check that the vacuum has safety features like an intake guard to prevent accidents. Make sure it’s working properly before swimming nearby.

Swimming Pool Conditions: Take a look at the pool’s condition. If the vacuum is stirring up a lot of dirt, it might be hard to see and could cause accidents. Wait until the water clears up before swimming.

Personal Swimming Abilities: Be honest about your swimming skills. If your swimming skills are not strong, it may be safer to wait until the vacuum is turned off before entering the water.

Supervision and Monitoring: If kids are swimming, make sure there’s an adult watching them closely. Keep an eye on the vacuum too, just in case anything goes wrong.

By considering these factors, you can enjoy swimming with a pool vacuum safely and have a great time in the water!

Can You Swim With a Pool Vacuum

Pros and cons of Swim With a Pool Vacuum

Pros

  • Maintains a debris-free pool environment, improving swimmers’ comfort.
  • Combines swimming and cleaning tasks into one activity.
  • Reduces manual cleaning effort and time spent on pool maintenance.

Cons

  • Potential for entanglement or injury if safety precautions are not strictly followed.
  • May increase maintenance needs and equipment replacement costs.
  • Swimming movements can hinder the vacuum’s ability to clean all areas thoroughly.

Best Practices for Pool Vacuuming

Alternative Times for Pool Vacuuming

For those who enjoy swimming, it’s best to schedule pool vacuuming during times when the pool is not in use. This approach ensures that cleaning does not interfere with recreational activities and maintains a clean pool environment throughout the swimming season.

Common Misconceptions

There are misconceptions that swimming with a pool vacuum is harmless or enhances cleaning efficiency.  It’s crucial to debunk these myths and underscore the significance of safety protocols to prevent accidents and uphold efficient pool maintenance practices.

Personal Safety Tips

When swimming with a pool vacuum, prioritize safety with these tips:

Supervise: Always supervise swimmers, especially children, when the vacuum is in use.

Keep Clear: Ensure vacuum cords and hoses are away from the pool edge to prevent tripping hazards.

Switch Off: Turn off the vacuum before entering or exiting the pool to avoid accidents.

Inspect Regularly: Check equipment for any damage or wear before each use.

Educate: Teach all users about the risks and safety measures associated with swimming alongside a pool vacuum.

Final Thought

Maintaining a clean and safe pool environment is essential for health and enjoyment. Pool vacuums, whether manual or automatic, play a crucial role in achieving this. Understanding the various types of pool vacuums and their safety considerations helps pool owners make informed decisions. Pool owners should prioritize regular pool maintenance and use appropriate vacuums for their specific needs. Following safety guidelines and keeping up with technological advancements can ensure a safe and pleasant swimming experience.

Frequently Asked Questions

Can you swim while the pool vacuum is running?

While it is technically possible to swim while a pool vacuum is running, it is generally not recommended due to safety concerns. The vacuum hose and moving parts can pose entanglement risks, and the vacuum may stir up debris and chemicals.

Are there pool vacuums designed for safe use while swimming?

Some pool vacuums are designed with safety features to minimize risks, but it is still best to avoid swimming while the vacuum is in use. Always check the manufacturer’s guidelines for safe operation.

Can a pool vacuum improve overall pool safety?

A pool vacuum can improve overall pool safety by maintaining clean and clear water, reducing the risk of infections and accidents caused by slippery surfaces or hidden debris.

How do pool vacuums affect water quality?

Pool vacuums positively affect water quality by removing debris, dirt, and contaminants, helping to maintain balanced chemical levels and clear water.

Is it safe for children to swim while a pool vacuum is in use?

It is unsafe for children to swim with a pool vacuum in the pool. Children may not be aware of the hazards posed by the vacuum, such as the risk of entanglement or exposure to stirred-up chemicals.

What measures can you take to ensure safety when using a pool vacuum?

To ensure safety while using a pool vacuum, always follow the manufacturer’s instructions, regularly inspect the vacuum for damage, and avoid using the pool while the vacuum is in operation.

Filed Under: Essentials

Effective Ways: How to Store a Vacuum Cleaner Properly

June 13, 2024 by bigfishtavernlagunaadmin Leave a Comment

Effectively storing a vacuum cleaner is essential for maintaining its performance and durability. In this extensive guide, we’ll explore top-notch methods and creative strategies to efficiently store your vacuum cleaner.From utilizing space-saving solutions like wall-mounted racks and hidden storage compartments to incorporating clever techniques for homes with limited floor space, we’ll provide practical tips to ensure your vacuum remains easily accessible and well-preserved. Whether your goal is to enhance organization or protect your investment, this guide provides the expertise and methods necessary for effective vacuum cleaner storage.

How to Store a Vacuum Cleaner

Importance of Proper Vacuum Storage

Proper vacuum storage is crucial for several reasons, especially when it comes to preserving the freshness, quality, and longevity of various items. Here are several key points that underscore the significance of appropriate vacuum storage:

  • Properly storing your vacuum cleaner is crucial. It preserves its value, maintains performance, and enhances the tidiness of your home.
  • Protect your investment by storing your vacuum properly. This safeguards its longevity and saves you from premature replacements.
  • Neatly storing your vacuum reduces clutter, making your living space more inviting and easier to clean.
  • Shielding your vacuum from dust and damage through proper storage adds years to its lifespan, ensuring smooth performance and avoiding unnecessary expenses.

Cleaning Before Storage

Before storing your vacuum, it’s important to follow these steps:

Emptying the Dust Bin or Bag

Ensure to clear any gathered dust or debris from the dust bin or bag of your vacuum cleaner. This prevents unpleasant odors and ensures optimal performance when you use it next.

Cleaning the Filters

Take the time to clean the filters of your vacuum thoroughly. This helps maintain suction power and prevents dust buildup, prolonging the life of your machine.

Wiping Down the Exterior

For the exterior cleaning, utilize a damp cloth to wipe down your vacuum cleaner. This removes any dirt or grime, keeping it looking clean and well-maintained.

How to Store Vacuum Cleaner

In a Closet or Cabinet

Vacuums fit well in closets or cabinets. This is great for big vacuums. It makes your home look tidier while still keeping the vacuum nearby.

Under the Bed

Under-bed storage is perfect for smaller or wireless vacuums. It keeps the room looking neat and tidy. Plus, it’s a space you already have that’s not used much.

On a Wall Mount

If you have a small or wireless vacuum, consider a wall mount. This saves floor space and makes sure it’s easy to get to. It’s a smart use of available space.

In a Designated Nook

Finding a special place for your vacuum means it stays out but ready to use. This is especially true for small homes or rooms. Space might be limited, but being creative helps keep everything in order.

Smart Storage Solutions for Small Spaces

In homes with limited floor space, discovering ingenious methods to store your vacuum cleaner is imperative. One way is using wall-mounted racks or shelves. These keep the vacuum accessible but out of the way. Using furniture that has hidden storage, like ottomans or cabinets, is also helpful. They help hide the vacuum when it’s not in use. You can even store your vacuum behind or under big furniture, such as couches or beds. This method makes the most of your home’s space. These storage solutions ensure your vacuum is organized and readily accessible when required.

Where Not to Store Your Vacuum

There are good and bad ways to store a vacuum cleaner. It’s not wise to keep it in bathrooms or other humid places. The dampness can harm the vacuum’s parts and lessen its life.

Also, don’t place it close to heaters or radiators. The heat can melt or warp the plastic, making it accessible to pets.

Keep vacuums away from where pets can reach them. Animals might chew the power cord or drop dirt and hair. This can block the vacuum and damage it.

Avoid overcrowded areas too. If the vacuum’s hose and tools get caught, they could tear or break.1 Knowing where not to store your vacuum is key to keeping it working well for many years.

Optimal Vacuum Cleaner Storage Solutions

When it comes to storing your vacuum cleaner, there are several optimal solutions to consider that can help keep your space organized and your vacuum cleaner in more good condition:

Storing Upright Vacuum Cleaners

Use wall-mounted hooks or hangers in closets to free up floor space and ensure easy access.

Organize the vacuum and its accessories in the closet to maximize space, utilizing shelves or baskets.

Select heavy-duty hooks or hangers securely anchored to the wall to prevent falls, especially for heavier vacuum cleaners. Regularly inspect stability for safety.

Storing Canister Vacuum Cleaners

Utilize storage bags or boxes specifically designed for vacuum cleaners to protect against dust and damage while maximizing space.

Keep accessories together by storing them in designated compartments within the storage bags or boxes. This guarantees convenient access and mitigates the risk of loss or misplacement.

Secure the hose and wand by wrapping them neatly around the vacuum cleaner or using built-in clips or hooks. This avoids tangling and ensures their immediate availability when required.

Storing Stick or Handheld Vacuum Cleaners

Utilize charging stations or docks specifically designed for the vacuum cleaner model. These stations keep the vacuum charged and ready for use while also providing a designated storage spot.

Mount the vacuum on hooks or racks affixed to walls or within closets. This conserves floor space while ensuring the vacuum remains readily available for swift cleaning tasks.

Store the vacuum in easily accessible areas such as utility rooms, kitchens, or near high-traffic areas for convenience. This encourages regular use and ensures the vacuum is readily available when needed.

Maintenance Tips for Proper Storage

Keep your vacuum in top shape by following some simple tips before you store it. Clean it well, including the dust bag or canister, and any filters. Doing this stops dirt from causing problems in the future.

If you use vacuum storage bags or boxes, your vacuum stays safe from dust and scratches. This keeps it clean and in good working order for next time you use it. 

Frequently Asked Questions

Why is proper storage of a vacuum cleaner important? 

Proper storage helps maintain your vacuum cleaner’s efficiency, prolongs its lifespan, and keeps your home organized by reducing clutter.

Can I store my vacuum cleaner in the garage?

Yes, you can store your vacuum cleaner in the garage, but ensure it is in a clean, dry area to prevent damage from dust, moisture, or pests.

How do I prevent my vacuum cleaner from falling over?

Use wall-mounted hooks or hangers, or store it in a stable, upright position. Ensure the storage area is stable and free from clutter to prevent the vacuum cleaner from tipping over.

Can the vacuum cleaner hose be damaged if stored improperly?

Yes, improper storage can cause kinks or damage to the hose. Secure the hose and wand by wrapping them neatly around the vacuum cleaner or using built-in clips.

Should I store my vacuum cleaner with the attachments?

Yes, keep all attachments together with the vacuum cleaner. Organize and protect the accessories using storage bags, boxes, or built-in compartments.

Bottom Line

Storing a vacuum cleaner effectively involves choosing the right location and method to ensure its longevity and ease of access. Whether you opt for wall-mounted hooks, designated closet space, or specialized storage bags, the key is to keep the vacuum and its accessories organized and protected. Ensuring stability to prevent falls, keeping accessories together, and placing the vacuum in easily accessible areas can make your cleaning routine more efficient and help maintain the vacuum cleaner in good condition. By following these tips, you can optimize your storage space and prolong the life of your vacuum cleaner.

Filed Under: Essentials

Vacuum Sealer Not Vacuuming? Discover Simple Fixes Now!

June 13, 2024 by bigfishtavernlagunaadmin Leave a Comment

Today, vacuum sealers are key to keeping food fresh for longer. They help maintain nutrients and stop spoilage. Yet, just like other tools, they can stop working properly. A common issue is when the vacuum sealer is not vacuuming or sealing well. This can cause air to become trapped in the vacuum sealer bags. Such a problem reduces the items’ shelf life. 

Why is My Vacuum Sealer Not Vacuuming?

This guide covers why a vacuum sealer might not work as it should. We’ll offer step-by-step tips to fix this issue. Plus, you’ll learn about a top-notch vacuum sealer collection from VEVOR. And, we’ll share some maintenance advice. This helps keep your vacuum sealer running for a long time.

Introduction to Vacuum Sealer Problems

Vacuum sealers are crucial for keeping food fresh longer. They remove air from bags to stop spoilage. This process locks in nutrients and flavor.

Yet, vacuum sealers can face problems. A major issue is when they don’t fully vacuum or seal.This lets air in, which can spoil foods.

This guide explains the importance of vacuum sealers and their issues. It also offers tips to fix problems with not sealing well.

Potential Reasons for a Vacuum Sealer Not Vacuuming

If your vacuum sealer isn’t working right, it could be due to several reasons. A damaged lid or gasket is a common issue. An undamaged lid can stop a tight seal from forming, letting air in.

This problem is similar to a worn-out gasket. It keeps the chamber from sealing well, making the vacuum pump ineffective.

Problems with the power supply are another possibility. If the power cord is damaged, cut, or frayed, it stops the machine from working properly. Also, if the vacuum pump is broken or blocked, the sealer won’t work right.

Issue

Description

Damaged Lid

A warped or cracked lid can compromise the vacuuming process by preventing a tight seal and proper air removal.

Power Cord Issues

Damage to the power cord can disrupt the electrical supply, affecting the vacuum sealer’s performance.

Gasket Problems

Damaged gaskets can lead to air leakage, impacting the functionality of the vacuum sealer.

Seal Bar Concerns

Dirty or damaged seal bars can cause leaks and hinder effective vacuuming.

Vacuum Pump Troubles

Malfunctioning vacuum pumps can result in inadequate air removal during sealing.

These issues can significantly impact the vacuum sealer’s ability to remove air from the bags. Knowing and solving these issues is key to keep your sealer working its best. It also ensures your foods stay fresh when stored.

Troubleshooting Vacuum Sealer Bag Issues

Moisture in Bags

Moisture on the bag’s surface stops it from sealing well. This moisture makes a barrier that the bag can’t break through to seal correctly. It’s like the bag is just not able to connect properly with the sealer.

Damaged or Incompatible Bags

If bags are torn or have holes, air can seep in. This leads to a bad seal. Plus, bags not designed for your sealer can cause issues too. They won’t work well together. 

Improper Bag Placement

Putting the bag on the sealing bar wrongly is a problem. The bag needs enough space to have the air removed properly. If it’s placed incorrectly, air doesn’t get pulled out as it should.

Why is My Vacuum Sealer Not Vacuuming?

Why is My Vacuum Sealer Not Vacuuming

Overheating Issues

One reason for a vacuum sealer’s poor performance is overheating. When a vacuum sealer works too long without a break, it can get too hot. This heat can harm its parts, causing it to pull less air. This means it might not vacuum as well as you would like. Giving the sealer breaks between uses and sticking to how long you use it, as the manual suggests, can avoid this issue.

Obstructed Vacuum Channels

Problems can also arise from blocked vacuum channels. For example, a full drip tray or something blocking the air inside can disrupt the sealing process. It may stop the vacuum pump from taking air out of the bags effectively.

Why is My Vacuum Sealer Not Vacuuming?

Checking and Maintaining Vacuum Sealer Components

It’s vital to keep your vacuum sealer in top shape. Clean the seal bar and gaskets often to avoid sealing problems. This removes food bits or buildup that could stop a good seal. Also, check the power cord and hoses for any damage or blockages. These can make the sealer less effective.Cleaning and checking these parts can fix many issues and make your sealer last longer.

Cleaning Seal Bar and Gaskets

The seal bar and gaskets are key for sealing well. Keep them clean to prevent sealing issues. This stops moisture and food from blocking a tight seal.3 Regular cleaning helps avoid bag placement and moisture problems. It’s a simple way to maintain your vacuum sealer.

Inspecting Power Cord and Hoses

Check the power cord and hoses for any problems. Watch for damage like cuts, cracks, or bad connections. These could affect the sealer’s function. Fixing the power cord or hose issues ensures your sealer works well.

Upgrading to a Reliable Vacuum Sealer

Looking to replace your old vacuum sealer or finding a better one? Look no further than VEVOR vacuum sealers. VEVOR is known for top-notch yet affordable sealers.

VEVOR offers a wide range of external and chamber vacuum sealers. For a multi-use sealer, consider the VEVOR 80 Kpa, 130W. It can seal dry and moist items, with auto and manual modes.

Need something with more power? The VEVOR DZ-260A Chamber Vacuum Sealer is your best bet. It has 260W of sealing power and a 6.5 m³/h pump rate. Perfect for all, from home to businesses.

Regular Maintenance Tips

Keeping your vacuum sealer working well for longer is simple. Clean the seal bar every time you use it. Also, check the gaskets, lid, power cord, and the overall sealer for damage. Fix any problems you find quickly.

To take care of your sealer, store it in a cool, dry spot. Keep it away from sunlight and heat. This will protect its parts. Use top-quality bags that fit your sealer. This ensures the sealing process works well and avoids problems

Frequently Asked Questions

What are the common reasons why a vacuum sealer may not be vacuuming properly?

A vacuum sealer might not work well because of a few reasons. This includes a lid or gasket that’s damaged. There could be issues with the power, vacuum pump, or even the bags if they are wet or damaged. It’s also important to place the bags correctly and make sure no parts are blocked. This hinders the sealer from functioning properly.

How can I troubleshoot a vacuum sealer that is not vacuuming effectively?

If your vacuum sealer isn’t doing its job, start by checking a few key parts. Look at the lid and gasket to see if they’re broken. Also, make sure the power is working okay and the vacuum pump isn’t faulty. Use bags that work with your sealer and ensure they’re placed right. Deal with any heat issues or blockages that might be stopping the vacuum from forming correctly.

What are some reliable vacuum sealer options to consider?

For those thinking about a new vacuum sealer, the VEVOR collection is worth considering. They have both external and chamber models. Consider models like the VEVOR 80 Kpa, 130W for reliable performance at an affordable price. Or, look at the VEVOR DZ-260A Chamber Vacuum Sealer for a different design option.

Why is my vacuum sealer not removing air from the bags? 

Answer: This issue could be due to an improperly positioned bag, a dirty or damaged seal bar, or a malfunctioning vacuum pump. Ensure the bag is correctly placed, clean the seal bar, and check for any visible damage or blockages.

Why is regular maintenance important for a vacuum sealer?

Ensuring regular maintenance for your vacuum sealer is essential to extend its lifespan and enhance operational efficiency. Clean the seal bar, and keep an eye on the gaskets and power cord. Promptly fix any problems you notice. Using the right bags and storing your sealer properly also play a part in keeping it in good shape and sealing efficiently.

Conclusion

This guide gave you a lot of info on why your vacuum sealer might not work right. We talked about problems with the lid, gasket, power, pump, and bags. By following the steps we laid out, you can figure out what’s wrong and fix it. Your vacuum sealer should start working better.

We also shared info about the VEVOR vacuum sealers. They are an ideal choice because of their durability and cost-effectiveness.VEVOR has both kinds: external and chamber models. This gives you more options.

In addition, we told you how to take care of your vacuum sealer. You should clean the seal bar and check the gaskets and power cords. Also, use the right bags. Doing these things will help your sealer last longer.

Filed Under: Essentials

Does vacuuming ants kill them? Find Out the Truth!

April 15, 2024 by bigfishtavernlagunaadmin Leave a Comment

Have you ever wondered if vacuuming ants kills them? It’s a common question, especially when we’re faced with pesky ants invading our homes. Some people believe that sucking up ants with a vacuum cleaner might be an effective way to get rid of them. While vacuuming can remove ants from your immediate surroundings, it might not necessarily kill them. Ants are resilient creatures, and they could survive being vacuumed up, especially if they’re not crushed or harmed in the process. So, while vacuuming might help manage an ant problem temporarily, it may not be a foolproof solution.

Does vacuuming ants kill them?

How Vacuuming Works

When you switch on your vacuum cleaner, it starts making a whooshing sound. That’s because it’s sucking in air, kind of like a big straw. Inside the vacuum, there’s a strong motor that creates this suction power. As the air gets pulled into the vacuum, it brings along all the crumbs, dirt, and dust bunnies hanging out on your floor. 

They zoom through a hose and into the vacuum’s belly. But how does it all disappear? Well, inside the vacuum, there’s a clever filter or bag that traps all the yucky stuff. Meanwhile, clean air gets pushed back out, leaving your home spick and span! And that’s the magic of vacuuming—making messes vanish with just the flip of a switch!

Does Vacuuming Kill Ants?

Ever wondered if vacuuming can zap those pesky ants scurrying around your home? Well, it’s a question many ask. When you vacuum, the suction pulls in air and anything in its path – including ants.Let’s talk about ants. When you vacuum up ants, they get sucked into the vacuum cleaner along with the air. Depending on the strength of the suction and the size of the ants, they may or may not survive the journey.

 Some ants might get squished or crushed by the suction force, which would kill them. However, if the suction isn’t strong enough to harm them or if they manage to cling onto surfaces inside the vacuum, they could survive. So, while vacuuming can remove ants from your home, whether or not it kills them depends on various factors. It’s important to keep in mind that vacuuming alone might not completely solve your ant problem, but it can be part of an overall strategy to manage it.

Factors to Consider

Several factors determine the effectiveness of vacuuming ants:

Ant Species

Some species may perish when subjected to the suction of a vacuum cleaner, while others may survive and continue their activities.

Nest Location

The location of the ant nest plays a significant role in whether vacuuming will eliminate the colony. If the nest is deep within the structure of your home, vacuuming may only remove a portion of the ants, allowing the colony to persist.

Colony Size

The size of the ant colony also affects the outcome of vacuuming. Larger colonies may have multiple satellite nests, making it challenging to eradicate them entirely through vacuuming alone.

Vacuuming IS Recommended, Especially for Carpenter Ants.

Vacuuming IS Recommended, Especially for Carpenter Ants

Bug experts, also known as entomologists, are the superheroes of the insect world. They study bugs and know all the best ways to keep them at bay. When it comes to dealing with pesky carpenter ants, these experts have a simple yet powerful recommendation: vacuuming.

Carpenter ants can be a real headache, especially if they start munching on the wooden parts of your home. But fear not, because vacuuming is an effective weapon in the battle against these tiny intruders.

Bug experts recommend vacuuming for several reasons. Firstly, it helps remove carpenter ants from your home, reducing their numbers and potential damage. Secondly, vacuuming eliminates the ants’ scent trails, disrupting their communication and making it harder for them to find their way back.

Moreover, vacuuming is a safe and eco-friendly method of pest control, as it doesn’t involve harmful chemicals or pesticides. It’s also easy and convenient for homeowners to do themselves.

Alternatives to Vacuuming

While vacuuming can be a useful tool in managing ant infestations, it may not always be the most effective method. Here are some alternative strategies to consider:

Ant Baits

Ant baits are tiny traps that lure ants with tasty treats, like sugary syrups or protein-rich foods. But here’s the trick – the bait contains poison that eventually knocks out the entire ant colony. It’s like a stealthy ninja move against those sneaky ants! So, if vacuuming isn’t your thing, consider giving ant baits a try to keep your home ant-free.

Insecticides

Insecticides are powerful sprays or powders designed to zap pesky ants and other bugs. You just spray or sprinkle them in areas where ants hang out, like along baseboards or near entry points. These insecticides contain chemicals that quickly take down ants on contact. It’s like giving those ants a one-two punch and keeping your home ant-free!

Seal Entry Points

Open entry points are like welcome mats for pesky insects such as ants. These are gaps, cracks, or holes in walls, doors, or windows that allow bugs easy access into your home. When entry points remain open, ants can march right in and cause a nuisance.

Frequently Asked Questions (FAQs)

Does vacuuming ants spread them to other areas?

Vacuuming may inadvertently disperse ants to different locations within the house, especially if the vacuum bag or canister is not properly sealed.

Can vacuuming alone eradicate an ant infestation?

While vacuuming can reduce ant populations temporarily, it is unlikely to eliminate an entire infestation without additional measures.

Is it safe to use chemical insecticides for ant control?

Chemical insecticides can be effective but should be used cautiously, following manufacturer instructions and considering potential risks to human health and the environment.

Are there any risks associated with vacuuming ants?

While vacuuming ants is generally safe, individuals with allergies or sensitivities to ant bites should take precautions to avoid contact with the insects.

How often should I vacuum ants to control infestations?

Vacuuming ants regularly can help manage infestations, especially when combined with other ant control methods. Aim to vacuum affected areas daily until the infestation is under control.

Conclusion

Vacuuming ants can be an effective means of temporary control, but its success depends on various factors such as vacuum strength, ant species, and infestation size. While vacuuming may kill some ants, others may survive or simply relocate, necessitating additional measures for long-term ant management. By understanding the mechanics of vacuuming ants and implementing best practices, you can minimize their presence in your home and maintain a pest-free environment.

Filed Under: Essentials

How to Purge BHO Without a Vacuum: Proven Techniques!

April 5, 2024 by bigfishtavernlagunaadmin Leave a Comment

Got sticky BHO (Butane Hash Oil) that needs purging, but no vacuum to help? No problem! I’m here to show you some simple ways to purge BHO without needing fancy tools. I’ve been through this process myself and learned a lot along the way, so let me walk you through it with some tips and insights from my own experience.

How to Purge BHO Without a Vacuum?

What is BHO?​

BHO stands for Butane Hash Oil, a potent cannabis extract. It’s made by soaking cannabis buds in butane, pulling out THC and cannabinoids. Then, the butane evaporates, leaving behind thick, sticky BHO. Since BHO is sticky and flammable, it’s important to purge it, or remove any leftover butane. I’ve made BHO myself and learned how crucial purging is. If you skip this step, you might end up with a product that’s unsafe or tastes off. Don’t worry—I’ll walk you through easy ways to purge BHO without a vacuum!

Why is Purging Important?​

Purging BHO is vital because butane is flammable. You don’t want any leftover in your BHO. I’ve made the mistake of rushing this process, and it led to some unpleasant results. Purging removes this leftover butane and makes your BHO safe to use. If you skip purging, you might end up with a dangerous product. Trust me, taking your time is worth it.

Risks of Residual Solvents

Leftover butane in BHO is risky. It can make the BHO dangerous to consume and affect the taste. I once tried using BHO that wasn’t fully purged, and the flavor was off, which really impacted the whole experience. So, purging is key to getting rid of any remaining solvents.

How to Purge BHO Without a Vacuum​

Here’s how to purge BHO without a vacuum:

Step 1: Gather Your Tools
You’ll need your BHO extract, a heat-safe container, a pot for boiling water, a stove or hot plate, a thermometer, and a stirring tool (like a silicone spatula). The first time I tried this, I didn’t have a thermometer, and I had to guess the temperature. Don’t make that mistake—get one, it makes all the difference!

Step 2: Set Up a Double Boiler
Fill your pot with water and heat it on the stove. Once it’s simmering, place your container with the BHO in the pot. This lets the gentle heat from the water slowly purge the BHO. Be careful not to use too much heat—if you heat the BHO too fast, it can lose its potency.

Step 3: Monitor the Temperature
Use your thermometer to check the water temperature. This gentle heat helps the butane evaporate without overheating the BHO. I’ve found that maintaining a steady temperature is key to a successful purge. I’ve made BHO that turned out great simply by making sure the water stayed at the right temperature throughout.

Step 4: Stir and Scrape
Stir the BHO gently and scrape the sides of the container to bring the purged oil back to the center. This helps spread the BHO evenly. Trust me, stirring gently is key—if you’re too rough, you could end up disrupting the process. It’s all about patience!

Step 5: Continue Purging
Keep an eye on the temperature and stir the BHO regularly. The purging process can take a few hours, so be patient. Take your time to ensure all the butane evaporates. I’ve had to wait for several hours in the past, and I can tell you—it’s worth it when the final product is clean and ready to use.

Step 6: Cool and Store
Once the BHO is purged, take it off the heat and let it cool. Now your BHO is ready to use safely! I’ve always been amazed at how much better the BHO is once it’s fully purged. It’s cleaner, smoother, and safer to use.

Tips for Successful BHO Purging

Let’s talk about some quick tips for successful BHO purging:

  • Use low heat and take your time.
  • Spread out the BHO to help it evaporate evenly.
  • Avoid open flames—use heat sources safely.
  • Keep the temperature steady during purging.
  • Watch your BHO carefully to ensure it’s purging correctly.
  • Be patient—good things take time! I’ve learned this the hard way—rushing the process doesn’t work.

Comparison Between Vacuum and Non-Vacuum Purging

Vacuum purging is fast and thorough, but it requires expensive equipment. I’ve used both methods, and while vacuum purging is effective, non-vacuum methods like this one are much more affordable and still work great. Non-vacuum methods need more time and effort, but I’ve had excellent results with them.

Frequently Asked Questions

Can you purge BHO without a vacuum?
Yes! Heat or air purging works well without a vacuum. I’ve personally used the heat method with great success.

What happens if you don’t purge BHO properly?
It can leave solvents behind, which can be harmful to consume. I’ve made the mistake of not purging enough in the past, and it wasn’t a pleasant experience.

How long does it take to purge BHO without a vacuum?
It depends on factors like the amount of BHO, temperature, and method used. Generally, it takes a few hours, but be patient—it’s worth it!

Can you reuse the purging equipment?
Yes, silicone mats and parchment paper are reusable. I always keep mine and use them for my next batch.

Are there other ways to extract BHO?
Yes! CO2 extraction is another popular method. I’ve tried a few different methods, but each one has its pros and cons.

By sharing my own experiences and tips, I hope you feel more confident about purging your BHO without needing a vacuum. Remember, patience and the right tools make all the difference!


Filed Under: Essentials

Why is My Shark Vacuum Not Charging: Troubleshooting Guide

April 4, 2024 by bigfishtavernlagunaadmin Leave a Comment

Shark vacuums are known for their important suction, advanced technology, and stoner-friendly designs. Still, like any ménage appliance, they can run into issues. A common issue many Shark vacuum owners encounter is the My Shark vacuum stopped working it is a frequent concern, and if you find yourself asking, “Why is my Shark vacuum not charging?, you’re not alone. This issue can arise due to several reasons, and understanding these factors can save you time, money, and frustration. In this composition, we’ll explore common causes and give practicable results to get your Shark vacuum charging again.

Why is my shark vacuum not charging?

Why Is My Shark Vacuum Not Charging?

There are several common reasons why your Shark vacuum might not be charging. The issue could be as simple as a faulty power outlet, a damaged charging cable, or dirty connections in the charging port. Sometimes the Shark vacuum stopped working because of blocked filters or overheating issues that trigger safety features preventing charging. Rechargeable batteries can degrade over time, making it harder for them to hold a charge. In some cases, internal damage or software glitches could be the cause. Identifying the problem is key to resolving it quickly and getting your vacuum back to work.

What Do You Do If Your Shark Vacuum Won’t Charge?

If your Shark vacuum won’t charge, start by checking the power outlet and trying a different one if necessary. Inspect the charging cord and adapter for visible damage, and make sure the battery is seated properly. A faulty power adapter is another common issue leading to Shark vacuum won’t charge scenarios. Clean the charging port to remove dust or debris that might be preventing proper contact. Let the vacuum cool down if it feels overheated, and clean or replace the filters. If the issue persists, try resetting the vacuum or checking for software updates. For more complex problems, such as internal damage, reach out to Shark customer support for further assistance.

Reasons Why Your Shark Vacuum Might Not Be Charging

Take a look at some common issues that might be causing your Shark vacuum to not charge properly.

Battery-related problems

When the battery doesn’t hold a charge, it means that even after charging it fully, the vacuum runs out of power sooner than expected. A Shark battery not charging could be due to old age, overcharging, or a manufacturing defect. This can happen due to various reasons such as the battery’s age or overuse. Similarly, if the vacuum loses power quickly after being charged, it can be inconvenient as you might not be able to finish cleaning the entire area.

Why is my shark vacuum not charging?

Charging port issues

This is where you plug in the charger to power up your vacuum. A damaged or dirty charging port is a major cause of Shark vacuum troubleshooting issues. Sometimes, people find that their vacuum’s charging port doesn’t work as it should. This can be frustrating because if the charging port isn’t working, you can’t charge your vacuum. It’s important to check the charging port for any dirt or damage.

Power adapter malfunction

Sometimes, the problem is with the outlet rather than the adapter. If that doesn’t work, take a close look at the adapter to see if you can spot any visible damage. A faulty adapter can lead to Shark not charging problems. If the wire is frayed or if there are any other signs of damage, it’s best to stop using the adapter immediately and reach out to Shark’s customer support for assistance.

Troubleshooting Steps

Test The Outlet

When things don’t work, testing the outlet is key. Just plug in something like a lamp or phone charger. If the outlet works but the vacuum still doesn’t charge, you may have Shark vacuum problems related to the power supply. Check if the circuit breaker is okay. Sometimes it just needs a reset. Testing the outlet helps us know where the issue lies. So, next time something doesn’t work, don’t forget this simple step!

Rest the Vacuum

One easy step can often fix the problem: resetting the vacuum. First, make sure it’s unplugged for safety. If the Shark vacuum stopped working completely, resetting might restore functionality. Then, check for any clogs or tangled brush rolls. Once everything looks good, press the reset button. After resetting, plug it back in and give it another go. If it still doesn’t work, you might need to call for help.

Change the Batteries

When your device stops working, it might just need a simple fix: changing the batteries. It’s like giving it a fresh burst of energy to keep going. If your Shark vacuum won’t charge despite changing the batteries, there might be a deeper issue. First, check if your device uses batteries. If it does, open up the battery compartment. Once the new batteries are in, close the compartment and try turning on your device again.

Why is my shark vacuum not charging?

Clean the Charger and Battery

Take a soft, dry cloth and gently wipe the charger and battery. This helps remove any dust or dirt that might be blocking the connection. Cleaning these components can often resolve Shark vacuum troubleshooting issues. Make sure there’s no debris or corrosion on the charger’s pins or the battery’s contacts. Once everything is clean and dry, plug the charger back into the power outlet and reinsert the battery into your device.

Clean the Vacuum

When your vacuum isn’t sucking up dirt like it used to, it might need a good cleaning. Just like we need a shower to stay fresh, vacuums need a clean-up too. Start by unplugging it for safety. Cleaning your vacuum regularly can prevent the Shark battery not charging problem. Empty the dustbin or bag and give it a wash if needed. Next, check the filters and brushes for any dirt or hair buildup. Finally, check the hoses and attachments for clogs. Clear them out if necessary. Once everything’s clean, plug it back in and give it a test run. A clean vacuum works like a charm!

Consider Getting a Replacement

If you’ve tried all the above steps and your Shark vacuum still refuses to charge, it may be time to consider getting a replacement. Contact Shark customer support for further assistance and information on warranty coverage or replacement options. If your Shark vacuum won’t charge even after replacing components, it might be time for a new model.

Maintenance Tips to Prevent Charging Issues

To prevent charging problems in the future, consider the following maintenance tips:

  • Proper storage of the vacuum: Store your Shark vacuum in a clean, dry place away from direct sunlight and moisture.
  • Regular cleaning of charging components: Clean the charging port and power adapter regularly to prevent dust and debris buildup.
  • Avoid overcharging: Overcharging your vacuum can reduce the lifespan of the battery. Remove the vacuum from the charger once it’s fully charged to prolong its battery life. Overcharging is a common issue that can lead to Shark not charging problems.

When to Seek Professional Help

If none of the troubleshooting steps work and your Shark vacuum still won’t charge, it might be time to consult a professional. For advanced Shark vacuum troubleshooting, contacting Shark’s support team is your best bet. Professional technicians know all about fixing vacuums, and they can figure out what’s wrong and how to fix it. Plus, if your vacuum is still under warranty, you may be eligible for a replacement or repair.

Frequently Asked Questions

Why does my Shark vacuum battery drain quickly?

Several factors can contribute to rapid battery drain, including prolonged use on high suction settings, operating the vacuum with a clogged filter or brush roll, or a faulty battery. Address these issues promptly to optimize battery life.

Is it safe to leave my Shark vacuum plugged in overnight?

While leaving your vacuum plugged in overnight is generally safe, it’s advisable to unplug it once fully charged to prevent overcharging, which can shorten the battery’s lifespan over time.

How can I extend the lifespan of my Shark vacuum battery?

To prolong your vacuum battery’s lifespan, avoid fully depleting it before recharging, store it in a cool, dry place when not in use, and clean the battery contacts regularly to prevent corrosion.

Can I use my Shark vacuum while it’s charging?

It’s not recommended to use your Shark vacuum while it’s charging, as this can affect charging efficiency and potentially damage the battery. Allow the vacuum to charge fully before use for optimal performance.

How do I know if my Shark vacuum battery needs replacement?

If your vacuum fails to hold a charge or exhibits reduced suction power despite being fully charged, it’s likely time to replace the battery.

Conclusion

A Shark vacuum not charging can be a frustrating problem to encounter, but with the help of this troubleshooting guide, you should be well-equipped to identify and resolve the issue. My Shark vacuum won’t charge is a common concern, but by checking the power connection, cleaning the charging contacts, testing with a different outlet or charger, and contacting customer support if needed, you can hopefully get your vacuum back up and running in no time. Remember to perform regular maintenance on your Shark vacuum to prevent charging issues in the future, such as keeping the charging contacts clean and replacing the battery when necessary. With proper care and attention, your Shark vacuum can continue to provide you with reliable cleaning performance for years to come.

Filed Under: Essentials

How to vacuum pack fish?

March 30, 2024 by bigfishtavernlagunaadmin Leave a Comment

Vacuum packing fish is a great way to keep it fresh for longer. It’s like sealing it up tight so no air can get in.  When you vacuum pack, you’re basically removing all the air from around the fish and sealing it up tight in a bag.  To vacuum pack fish, you’ll need a special machine called a vacuum sealer and some plastic bags. With just a few simple steps, you can ensure your fish stays delicious until you’re ready to cook it. Let’s dive into the process of vacuum packing fish!

How to vacuum pack fish?

Types of Fish Suited for Vacuum Packing

Fatty Fish vs. Lean Fish

While vacuum packing is suitable for various types of fish, it is particularly effective for fatty fish such as salmon, trout, and mackerel. The higher oil content in fatty fish makes them more prone to oxidation, making vacuum sealing an ideal preservation method.

Whole Fish vs. Fillets

Both whole fish and fillets can be vacuum packed, but the process may vary slightly depending on the type of fish. Whole fish may require additional cleaning and preparation before vacuum sealing, while fillets can be vacuum packed directly after trimming and portioning.

Which fish products can be vacuum sealed?

Whole Fish: Whole fish can be vacuum sealed easily. Whether it’s a trout, salmon, or tilapia, you can vacuum seal them whole to maintain their freshness.

Fillets: Fillets are another fish product that can be vacuum sealed. Whether it’s a thick fillet like a salmon steak or a thinner fillet like a sole, vacuum sealing helps preserve their flavor and texture.

Fish Steaks: Fish steaks, such as tuna or swordfish, can also be vacuum sealed. This ensures they stay moist and flavorful, ready to be cooked whenever you’re ready.

Shrimp and Prawns: Shrimp and prawns are seafood delicacies that can also benefit from vacuum sealing. It keeps them fresh and prevents freezer burn, allowing you to enjoy their taste for longer.

Fish Portions: If you have smaller portions of fish, like fish sticks or nuggets, you can vacuum seal them too.However, there are some fish products you should avoid vacuum sealing:

Cooked Fish: Cooked fish, such as leftover grilled salmon or fried fish, should not be vacuum sealed. The moisture content and texture change during cooking, which may not be suitable for vacuum sealing.

Fish with Sauces or Marinades: Fish that has been prepared with sauces or marinades should not be vacuum sealed. The liquid content can interfere with the vacuum sealing process and may lead to spoilage.

Soft Fish: Fish with delicate textures, such as flounder or sole, may not hold up well to vacuum sealing. The pressure from the vacuum sealer can crush these delicate fish, altering their texture.

Advantages of vacuum packing fish

Longer shelf life

When you vacuum pack fish, you’re giving it a superpower: a longer shelf life. This means your fish stays fresh for much, much longer. How does it work? By sucking out all the air from the package, vacuum packing stops bacteria from growing and making your fish spoil. No more yucky smells or freezer burn! Plus, it saves space in your freezer and keeps you ready for a tasty seafood meal anytime. So, next time you’re packing fish, remember: vacuum packing means fresher fish for longer – and that’s something to reel in!

Preservation of flavour and texture

When you vacuum pack fish, you’re not just sealing it up – you’re locking in its flavor and texture. That’s because vacuum packing prevents air from getting in, which means no more flavor loss or mushy textures. Your fish stays as delicious and firm as when you first caught it. Whether it’s a juicy fillet or a delicate piece of seafood, vacuum packing ensures it tastes just as good when you’re ready to cook it.

Prevention of freezer burn

vacuum sealing creates a tight seal around the fish, preventing moisture loss and the formation of ice crystals. That means when you’re ready to cook, your fish will be perfectly preserved, without any icy surprises. Enjoy delicious, frost-free fish every time with vacuum packing!

Efficient storage and transport cheak baki

Vacuum sealing makes fish packs compact and easy to store. Whether it’s in your freezer at home or during transport to market, vacuum-packed fish takes up less space and stays fresher longer. No more bulky containers or messy leaks – just neatly sealed packages ready for storage or delivery. With vacuum packing, storing and transporting fish has never been more efficient!

Marinating and preparation

Vacuum packing isn’t just about storing fish; it’s about making meal prep a breeze!  The tight seal ensures the marinade gets absorbed evenly, giving your fish extra flavor. Plus, vacuum-packed fish is easy to prepare – just thaw, cook, and enjoy! No need to transfer to another container or worry about messy spills. With vacuum packing, marinating and preparing fish has never been simpler!

Vacuum packing fish

When it comes to keeping fish fresh, vacuum packing is a top pick. This method seals fish tightly in a plastic bag, removing all the air inside. Why does this matter? Well, without air, bacteria can’t grow as easily, so your fish stays fresher for longer. Plus, vacuum packing prevents freezer burn, keeping your fish tasting great.

The Vacuum Packing Process Step-by-Step

Inserting the Fish into the Bag

Once the fish is cleaned and seasoned (if desired), place it inside the vacuum bag. Be sure not to overfill the bag to allow for proper sealing.

Sealing the Bag

After inserting the fish, carefully seal the vacuum bag using the sealing mechanism on your vacuum sealer. Guided by precision, one positions the unsealed extremity of the bag or container into the vacuum sealer, initiating the mechanism to commence air extraction from the packaging.

Removing Air from the Bag

Once the bag is sealed, place it inside the vacuum sealer and initiate the vacuum packing process. This creates a tight seal around the food, keeping it fresh for longer.

Utilizing Vacuum Packed Fish

Convenient Storage: Vacuum packing keeps fish fresh for longer in the fridge or freezer. 

Easy Meal Prep: When you’re ready to cook, simply take out a pack of vacuum packed fish. There’s no need to thaw it beforehand – just run it under cold water for a few minutes, and it’s ready to use.

Versatile Cooking: Vacuum packed fish can be used in various recipes. Whether you’re grilling, baking, or frying, it cooks up beautifully and retains its flavor and moisture.

Less Mess: Since vacuum packed fish is sealed tightly in the packaging, there’s no messy cleanup. Simply discard the packaging after use, and you’re done!

Reduce Waste: With vacuum packing, you can buy fish in bulk and store it for later use.

FAQs about Vacuum Packing Fish

Can I vacuum pack fish with bones?

Yes, you can vacuum pack fish with bones. However, be cautious to avoid puncturing the vacuum bags with sharp bones.

Can I vacuum pack cooked fish?

Yes, you can vacuum pack both raw and cooked fish. However, ensure that cooked fish has cooled down to room temperature before vacuum sealing to avoid condensation inside the bag.

Can I reuse vacuum bags?

As for the shelf life of vacuum-packed fish, it can vary depending on storage conditions.

How long can vacuum-packed fish last?

Properly vacuum-packed fish can last in the refrigerator for several days to a week, depending on the type of fish and how well it’s sealed. In the freezer, vacuum-packed fish can last for several months without significant loss of quality.

Should I add any extra precautions when vacuum packing fish?

For added protection, you can double-seal the bags, especially if you’re planning to freeze the fish for an extended period.

Conclusion

Vacuum packing fish is a smart choice for keeping it fresh, flavorful, and ready for cooking. Whether you’re storing it in the fridge or freezer, vacuum packing extends the shelf life of fish and reduces the risk of freezer burn. Additionally, vacuum packed fish offers convenience in meal preparation, versatility in cooking methods, and minimal cleanup. By utilizing vacuum packed fish in your kitchen, you can enjoy delicious seafood dishes with ease while reducing food waste.

Filed Under: Essentials

Can you vacuum seal liquids?

March 25, 2024 by bigfishtavernlagunaadmin Leave a Comment

Can you vacuum seal liquids? It’s a question many people have when they’re trying to store or preserve their favorite soups, sauces, or even juices. Vacuum sealing has become a popular method for keeping food fresh for longer periods, but when it comes to liquids, things can get a bit tricky. In this article, we’ll explore whether it’s possible to vacuum seal liquids, the challenges involved, and some tips to help you do it safely and effectively. So, let’s dive in and find out if your liquid favorites can be vacuum sealed!

Can you vacuum seal liquids?

In bags with an vacuum sealer machine

“In bags with a vacuum sealer machine” refers to using a special machine to remove all the air from bags before sealing them shut. These machines work by sucking out the air, creating a tight seal around the food inside the bag. But when it comes to liquids, things can get a bit tricky. Liquids have a tendency to flow, and if you try to vacuum seal them in a regular bag, they might spill out or cause the seal to break. To vacuum seal liquids, you need special bags designed for this purpose. These bags are usually made of thicker material and have special channels or trays to collect the liquid. When you place the liquid inside these bags and use the vacuum sealer machine, the liquid is contained properly, and the machine can remove the air without causing any spills or leaks. So, if you want to vacuum seal liquids, make sure you have the right bags and equipment. This will ensure that your liquids stay fresh and sealed properly for longer periods.

In with a chamber style vacuum sealer machine

“In with a chamber style vacuum sealer machine” means using a different kind of machine to vacuum seal liquids. Unlike the regular vacuum sealer machines that you might see at home, chamber style machines work in a special way. With a chamber style vacuum sealer machine, you place the entire bag of liquid inside a chamber. Then, the machine removes the air from the entire chamber, not just from the bag itself. This creates an even stronger vacuum seal, making it perfect for sealing liquids without any spills or leaks. These machines are often used in professional kitchens or food processing facilities because they can handle liquids more effectively. They provide a more reliable seal and can handle larger quantities of liquids at once. 

So, if you’re looking to vacuum seal liquids, using a chamber style vacuum sealer machine might be the way to go. It ensures that your liquids stay fresh and sealed properly, without any mess or hassle.

In a vacuum canister

“In a vacuum canister” refers to another method of vacuum sealing liquids. Instead of using bags or a chamber-style machine, you can use a special container called a vacuum canister. These canisters are made of sturdy materials like plastic or glass and have a lid with a valve. To vacuum seal liquids using a vacuum canister, you simply place the liquid inside the canister, close the lid tightly, and then use a handheld vacuum pump or an electric pump to remove the air from the canister. When you take out the air from the canister, the pressure inside goes down, making a vacuum. This vacuum stops the liquid from going bad by keeping air away and stopping germs from growing. After you remove the air, you can close the valve on the lid to keep the vacuum. Vacuum canisters are good for storing liquids such as soups, sauces, or marinades because they’re strong and can be stacked in the fridge or pantry. They come in different sizes for storing different amounts of liquids.

Mason Jars

If you’re looking to vacuum seal liquids, Mason jars can be a superb option.These jars, commonly used for canning and preserving foods, offer a reliable way to seal liquids while keeping them fresh.To vacuum seal liquids in Mason jars, you’ll need special accessories like vacuum seal lids and a vacuum sealer with a hose attachment. Begin by pouring your liquid into the Mason jar, ensuring there’s some room left at the top for it to expand.Then, place the vacuum seal lid on the jar and attach the hose from the vacuum sealer to the lid’s valve. After you’ve arranged everything, switch on the vacuum sealer to eliminate the air from the jar. As the air is removed, you’ll notice the lid getting sucked down, creating a tight seal. This helps to keep the liquid inside fresh for longer periods by preventing air from getting in.

Tips for Vacuum Sealing Liquids Successfully

While vacuum sealing liquids may require some extra care, it is still possible to achieve satisfactory results with the right approach.

Freezing Before Sealing

Freezing before sealing liquids can be a smart strategy. When you freeze liquids like soups or sauces first, they become thicker and less likely to spill. This makes them easier to vacuum seal without any mess. Place your liquid in a container or bag that’s safe for freezing, and let it stay in the freezer until it starts to freeze a little. Then, transfer it to a vacuum sealing bag or container and remove the air using your vacuum sealer. This method helps preserve the flavor and freshness of your liquids while making the vacuum sealing process smoother and more effective.

Using Specialized Vacuum Sealer Accessories

When vacuum sealing liquids, specialized accessories are your best friend. Look for attachments like jar sealers or bottle stoppers designed specifically for sealing liquids. These accessories help create a tight seal, preventing any spills or leaks during the vacuum sealing process.

Risks and Considerations

Liquids can sometimes leak or spill during the sealing process, especially if they’re not properly contained. Additionally, some vacuum sealers may not be designed to handle liquids, which could damage the machine. Make sure to use appropriate equipment and carefully follow instructions to reduce these risks. Always consider the nature of the liquid and its potential behavior during the sealing process to ensure success.

Potential Leaks and Spills

One potential risk is the possibility of leaks or spills during the vacuum sealing process. It’s essential to ensure that the sealing area is clean and dry to prevent any moisture from compromising the seal.Additionally, freezing the liquid slightly before sealing can help make it thicker and less likely to spill.

Impact on Food Quality and Safety

Vacuum sealing liquids may also impact the quality and safety of the food. Certain liquids, such as dairy-based sauces or soups, may not freeze well and could experience texture changes or separation upon thawing. To get the best results, make sure to think about the unique characteristics of the liquid before you vacuum seal it.

Frequently Asked Questions

Can I vacuum seal liquids directly?

Vacuum sealing liquids directly is not recommended due to the risk of the liquid being sucked into the vacuum sealer, potentially damaging the machine and causing a messy cleanup. However, there are specialized vacuum sealers designed for liquids that employ different methods to handle the sealing process effectively.

Will vacuum sealing affect the taste of the liquid?

Yes, vacuum sealing can affect the taste of liquids. It can preserve freshness by reducing oxidation and aroma loss, potentially enhancing flavor. However, changes in texture and carbonation loss may occur. Proper sealing techniques are crucial to avoid contamination and ensure the desired taste outcome.

How long can vacuum-sealed liquids be stored?

The shelf life of vacuum-sealed liquids depends on various factors such as the type of liquid, storage conditions (temperature, light exposure, etc.), and whether any preservatives or stabilizers are added. Generally, vacuum-sealed liquids can be stored for an extended period compared to non-vacuum-sealed liquids due to the removal of air, which helps slow down the oxidation and microbial growth processes. However, it’s essential to follow recommended storage guidelines for specific liquids.

Can I vacuum seal carbonated beverages?

Carbonated beverages are not suitable for vacuum sealing as the pressure inside the bottle can cause it to burst during the vacuum sealing process. It’s best to avoid vacuum sealing carbonated liquids.

Are there any safety precautions I should take when vacuum sealing liquids?

When vacuum sealing liquids, it’s crucial to freeze them partially beforehand to prevent spillage and ensure a proper seal. Additionally, leave sufficient space at the top of the bag to accommodate expansion during sealing. Always follow manufacturer’s guidelines and avoid sealing hot liquids to prevent damage or injury.

Conclusion

With the right tools, preparation, and technique, vacuum sealing liquids becomes a straightforward endeavor, ensuring freshness and convenience in every package. By mastering the art of sealing liquids, you unlock a world of culinary possibilities while minimizing waste and maximizing efficiency.

Filed Under: Essentials

Why Does My Vacuum Smell Like Burning? Understanding the Cause and Solutions

March 23, 2024 by bigfishtavernlagunaadmin Leave a Comment

Have you ever switched on your vacuum cleaner and noticed a strange burning smell? It can be worrying and puzzling.  Sometimes, when we use our vacuum, things like dust, hair, or even small objects can get stuck in the machine. When these things rub against the motor or other parts, they might create heat, causing that burning smell.  So, let’s explore why your vacuum smells like it’s burning and how you can keep it fresh and clean for better cleaning sessions!

Why Does My Vacuum Smell Like Burning?

Causes of Burning Smell in Vacuums

Ever wondered why your vacuum sometimes smells like something’s burning? Let’s uncover the reasons behind this curious phenomenon.

Overheated Motor

One common culprit behind that burning odor is an overheated motor. Here’s what happens: when you use your vacuum for a long time without taking breaks, the motor can get really hot. It’s like when you run around a lot and start to sweat – your body’s working hard and needs a break to cool down. Similarly, the motor in your vacuum needs a breather too. If it doesn’t get one, it can get too hot and start to smell like it’s burning. So, if you notice that smell, it might be a sign to give your vacuum a break and let it cool down.

Clogged Filters or Hose

One possible reason for that burning smell is clogged filters or hoses. Here’s what happens: as you vacuum, dust and dirt clog up these parts, blocking airflow. When airflow is restricted, it makes the motor work harder, heating it up and causing the smell. To fix it, check your filters and hoses. If they’re clogged, give them a good clean or replace them. This simple step can keep your vacuum smelling fresh and working smoothly.

Worn Belts

Here’s the scoop: over time, the belts in your vacuum can wear out from regular use. When they’re worn, they might start slipping or rubbing against other parts, creating friction and heat. This heat can produce a burning smell. If you suspect worn belts, it’s best to replace them to keep your vacuum running smoothly and odor-free.

Accumulation of Debris

when you vacuum up a lot of dirt, hair, or other stuff, it can get stuck inside the machine. As this debris builds up, it can create friction and heat, leading to that burning smell.

Solutions to Eliminate the Burning Smell

That burning smell coming from your vacuum can be a real nuisance. Let’s look at some simple solutions to tackle this problem. Allow the Vacuum to Cool Down

Why Does My Vacuum Smell Like Burning?

Allow the Vacuum to Cool Down

Simply switch off the vacuum and give it some time to cool down. Just like how we need a break after exerting ourselves, vacuums need a breather too! Allowing it to cool down will prevent any potential damage and keep your vacuum running smoothly.

Check and Clean Filters and Hose

If your vacuum is emitting a burning odor, it might be due to clogged filters or hoses. Take a moment to inspect them. Remove any dirt or debris buildup, and give them a good clean. This simple step can improve airflow, prevent overheating, and eliminate the burning smell for a fresher cleaning experience.

Replace Worn Belts

These belts can wear down over time, causing friction and heat. To solve this, simply replace the worn belts with new ones. This simple step will keep your vacuum running smoothly and eliminate that unpleasant burning odor for good.

Clean the Vacuum Thoroughly

Take some time to give your vacuum a thorough cleaning. Remove any dust, hair, or debris that might be trapped inside. A clean vacuum will ensure proper airflow and help eliminate that pesky burning smell for good.

Professional Servicing

If your vacuum still emits a burning smell after trying DIY fixes, it might need professional servicing. Sometimes, the issue causing the burning smell in your vacuum requires specialized attention.Whether it’s a motor issue, worn-out parts, or something else entirely, professional servicing ensures that your vacuum is restored to optimal performance, eliminating the unpleasant burning odor once and for all.

Understanding the Risks: Potential Hazards of Ignoring the Odor

Ignoring the burning smell emitted by your vacuum cleaner can lead to detrimental consequences, including:Fire Hazard: Overheating components and electrical faults pose a significant risk of fire, endangering lives and property.
Reduced Performance: Continuously operating a malfunctioning vacuum can diminish its suction power and cleaning efficiency, compromising cleanliness.
Costly Repairs: Neglecting maintenance issues may escalate repair costs and shorten the lifespan of your vacuum cleaner.

Frequently Asked Questions

What should I do if my vacuum smells like burning?

If you detect a burning odor emanating from your vacuum cleaner, immediately switch it off, unplug it from the power source, and investigate the cause.

 Is it normal for a vacuum to smell like burning during initial use?

During the initial use of a new vacuum cleaner, it’s not uncommon to experience a slight burning smell as manufacturing residues burn off.

Can DIY repairs resolve the burning smell in my vacuum?

While minor maintenance tasks such as filter cleaning and belt replacement can be performed by users, complex repairs and electrical troubleshooting should be left to trained professionals.

Is it safe to continue using my vacuum if it smells like burning?

It’s not recommended to use a vacuum that emits a burning smell as it could indicate potential hazards or damage. Turn it off, unplug it, and address the issue before using it again.

Can a burning smell from my vacuum be dangerous?

A burning smell from your vacuum indicates a potential issue with the motor or components, which can pose safety hazards if left unaddressed.

Conclusion

Experiencing a burning smell from your vacuum can be alarming, but it’s often a solvable issue with proper maintenance and troubleshooting. By identifying the root cause and following the recommended solutions, you can eliminate the odor and ensure your vacuum operates efficiently and safely.

Filed Under: Essentials

Can you vacuum seal peaches?

March 15, 2024 by bigfishtavernlagunaadmin Leave a Comment

Do you love peaches but hate when they go bad too quickly? Well, there’s a clever trick to keep them fresh for longer – vacuum sealing! It’s like putting them in a magic bag that keeps them tasty and juicy. In this article, we’ll show you how to vacuum seal peaches step by step, so you can enjoy their yumminess whenever you want! 

Can you vacuum seal peaches?

Preserving Summer’s Bounty: A Complete Guide to Vacuum Sealing Peaches

Vacuum sealing is a cool way to store food. It’s like putting your food in a special bag and taking out all the air. It helps in keeping food fresh for 14 to 15 days or more. So, when you vacuum seal something, you make sure it stays tasty and doesn’t spoil quickly. It’s like giving your food a cozy, airtight hug to keep it yummy!This method also helps prevent freezer burn, maintaining the fruit’s texture and juiciness during storage. Additionally, vacuum sealing allows for efficient use of space in the freezer, optimizing storage capacity. Whether you’re looking to enjoy the taste of summer year-round or simply reduce food waste, vacuum sealing peaches is a convenient and effective way to prolong their quality and enjoy their deliciousness for longer periods.

Benefits of Vacuum Sealing Peaches

Preservation of freshness

Keeping peaches fresh for longer is important. Vacuum sealing is great for this. It removes air from the bag, keeping peaches safe. It stops bacteria from growing too. So, your peaches stay tasty and good to eat!

Extended shelf life

Vacuum sealing peaches is like giving them a magic shield against spoiling too soon. The machine will suck out all the air from the bag, leaving your food snug and airtight. This stops bacteria from growing and causing the peaches to go bad. So, they can sit on your shelf for a longer time, waiting for you to enjoy their sweet taste!

Retention of flavor and nutrients

When you vacuum seal peaches, you keep their yummy taste and healthy stuff locked in. Once the peaches are vacuum sealed they are ready to stay fresh longer. This means when you’re ready to eat them, they’ll still taste as delicious and be as good for you as when you first sealed them up!

Cost-Efficiency:

Vacuum sealing peaches saves money! When you seal them up, they stay fresh longer. This means you can buy peaches in bulk when they’re on sale and seal them for later. It’s like having your own peach stash! You won’t need to buy peaches as often, so you’ll save money in the long run.

Comparing Vacuum Sealing to Other Preservation Methods

When it comes to preserving food like peaches, there are various methods to choose from: canning, freezing, drying, and vacuum sealing. Each method has its pros and cons.

Canning involves cooking the fruit and sealing it in jars, which can be time-consuming and requires special equipment. Freezing is simple and maintains the fruit’s freshness, but it takes up freezer space and can lead to freezer burn over time. Drying removes moisture from the fruit, but it can alter the texture and flavor.

On the other hand, vacuum sealing removes air from the packaging, keeping the peaches fresh without altering their taste or texture. It’s quick, easy, and doesn’t require much space. Plus, vacuum-sealed peaches retain their nutrients better compared to other methods. Overall, vacuum sealing is a convenient and effective way to preserve peaches while maintaining their quality for longer periods.

Preparation Steps Before Vacuum Sealing 

Before vacuum sealing peaches, start by choosing ripe ones.Then, peel the skin off the peaches using a peeler or blanch them in boiling water to make peeling easier. Remove the pits carefully to prepare the peaches for sealing.

How to Vacuum Seal Peaches

  • It helps in keeping food fresh for 14 to 15 days or more. Here’s how it works:
  • Get your food ready. Make sure it’s clean and dry.
  • Place your food in a special bag made for vacuum sealing.
  • Press the button to suck out all the air from the bag.
  • The machine will seal the bag tightly so no air can get in.
  • Your food is now sealed and ready to stay fresh for longer.

Storing Vacuum Sealed Peaches

Storing vacuum-sealed peaches is a breeze! Once you’ve sealed them up nice and tight, you can keep them in the fridge for up to a few weeks.Label and freeze for long-term storage or refrigerate for short-term use. Thaw before enjoying. This method preserves their flavor and texture, ensuring delicious peaches whenever you crave them.When you’re ready to enjoy your peaches, simply thaw them in the fridge or at room temperature, and they’ll be as fresh and tasty as the day you sealed them!

Using Ready Vacuum Sealed Peaches

Thawing: Remove the vacuum-sealed peaches from the freezer and place them in the refrigerator overnight to thaw gradually. This ensures that the peaches retain their texture and flavor.

Using in Recipes: Once thawed, the vacuum-sealed peaches can be used in a variety of recipes. Add them to smoothies, yogurt, or oatmeal for a refreshing breakfast, or use them in desserts like cobblers, pies, or ice cream toppings.

Snacking: Vacuum-sealed peaches make for a convenient and healthy snack on their own.

Frequently Asked Questions

What methods can I use to vacuum seal peaches?

You can use various methods such as pre-freezing, dry-pack, or wet-pack methods to prepare peaches for vacuum sealing.

How long do vacuum-sealed peaches last?

Vacuum-sealed peaches can last significantly longer compared to traditional storage methods, typically for several months in the freezer.

Can I vacuum seal sliced peaches?

Yes, you can vacuum seal sliced peaches to make them easier to use and store for later use.

Are vacuum-sealed peaches safe to eat?

Vacuum-sealed peaches are safe to eat as long as they are properly prepared and sealed according to recommended guidelines.

Can I vacuum seal peaches with sugar or syrup?

Yes, you can vacuum seal peaches with sugar or syrup to enhance their flavor and preserve their texture during storage.

Summary

Vacuum sealing peaches is a game-changer for anyone seeking to enjoy the taste of summer year-round. By harnessing the power of vacuum sealing, you can prolong the freshness, flavor, and nutritional value of these delectable fruits, ensuring they remain a staple in your kitchen pantry for months to come. Whether you’re preparing for a bountiful harvest or simply looking to indulge in a taste of nostalgia during the off-season, vacuum sealing offers a convenient and efficient solution. So, next time you’re pondering how to make those juicy peaches last, remember the transformative potential of vacuum sealing. Embrace this preservation technique and elevate your culinary experiences with every perfectly sealed peach.

Filed Under: Essentials

  • « Go to Previous Page
  • Page 1
  • Interim pages omitted …
  • Page 4
  • Page 5
  • Page 6
  • Page 7
  • Page 8
  • Go to Next Page »

Primary Sidebar

Recent Posts

  • Can You Deep Fry in a Nonstick Pan? My Surprising Results
  • Clay Pot vs Dutch Oven: Which One Right for You?
  • Are Dutch Ovens Non Toxic? All You Need to Know
  • Is Low Specific Heat Capacity Good for Frying Pans​
  • Smeg Kettle vs Mini Kettle: Which One Fits Your Style?

Copyright © 2024 bigfishtavernlaguna.com. All right reserved.