• Skip to primary navigation
  • Skip to main content
  • Skip to primary sidebar
  • About Us
  • Affiliate Disclosure
  • Contact us
  • Cookie Privacy Policy
  • Privacy Policy
  • Sample Page
  • Terms of Use

Kitchen Guide

  • Appliance Reviews
  • Bakeware
  • Buying Guides
  • Product Comparisons
  • Recipes
  • Essentials
  • Cleaning

Essentials

Can you vacuum seal lettuce in bags?

March 13, 2024 by bigfishtavernlagunaadmin Leave a Comment

In the realm of culinary preservation, the question of whether one can vacuum seal lettuce in bags arises as a means to extend the lifespan of this delicate green. Lettuce, renowned for its crisp texture and vibrant flavor, is a staple in salads and various culinary creations. However, its perishable nature often prompts concerns about premature wilting and spoilage. Enter vacuum sealing—a technique widely employed to prolong the freshness of foods. But can it effectively be applied to lettuce? In this exploration, we delve into the feasibility, benefits, and potential pitfalls of vacuum sealing lettuce in bags, uncovering insights to optimize freshness and flavor retention while minimizing food waste.

Can you vacuum seal lettuce in bags?

Why Vacuum Seal Lettuce?

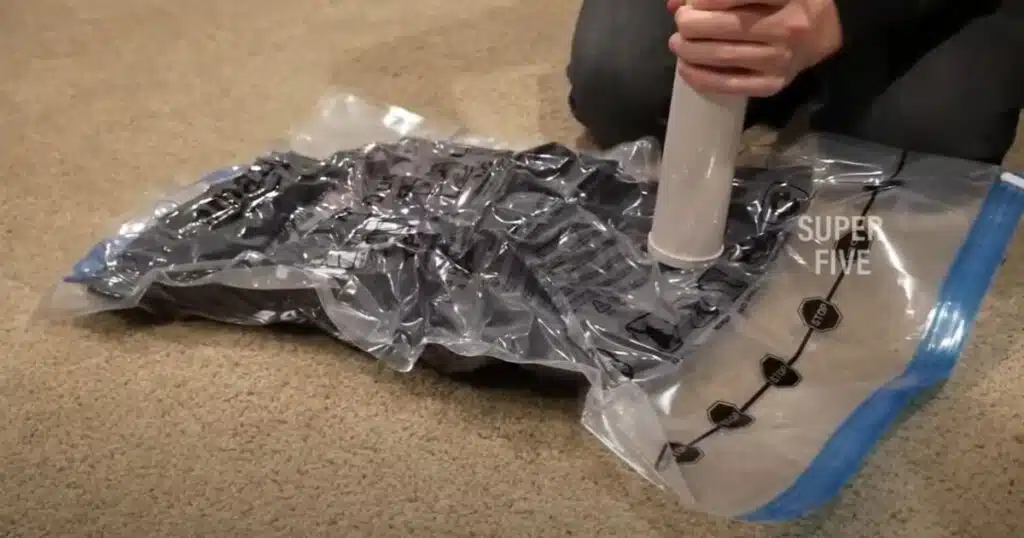
Extended Freshness: Vacuum sealing removes air from the packaging, slowing down the process of wilting and decay. This helps lettuce stay fresh for a longer period.

Take less space: But when you vacuum seal it, you can make it much smaller. By removing all the air, the lettuce becomes more compact, so it doesn’t take up as much room in your fridge.

Prevents Spoilage: Vacuum sealing creates an airtight environment that inhibits the growth of bacteria and mold, reducing the likelihood of spoilage.

Preserves Nutrients: By slowing down the degradation process, vacuum sealing helps preserve the nutritional content of lettuce. But when you vacuum seal lettuce, you’re creating a barrier between the lettuce and the air. This slows down the oxidation process, helping the lettuce to retain more of its nutrients.

Convenient Meal Prep: Vacuum-sealed lettuce is conveniently portioned and ready to use, making meal preparation quicker and more efficient.

How Long Does Vacuum Seal Lettuce Last?

When you vacuum seal lettuce in bags, it can last much longer than usual. Normally, lettuce starts to go bad in about a week. Vacuum sealed lettuce can stay fresh for more than 14 to 15 days.

The reason vacuum sealing helps lettuce last longer is because it removes all the air from around the lettuce. Air makes lettuce spoil faster. Without air, the lettuce stays crisp and green.

So, if you want your lettuce to last longer in the fridge, try vacuum sealing it in bags.

Benefits of Vacuum Sealing Lettuce

Vacuum sealing lettuce might seem like a small thing, but it comes with big benefits! Here are some reasons why vacuum sealing lettuce is a great idea:

Keeps It Fresh Longer: Vacuum sealing removes air from around the lettuce, which helps it stay fresh for a much longer time. That means less wastage and more crunchy salads for you!

Prevents Wilting: Have you ever bought lettuce only to find it all droopy and sad the next day? Vacuum sealing prevents that. Your lettuce stays firm and crisp, ready to eat whenever you are.

Prevents Wilting: Have you ever bought lettuce only to find it all wilted and sad later? Vacuum sealing helps prevent that. It keeps the lettuce firm and crunchy.

 Cost-effective: Lettuce can be stored longer, and it doesn’t rot. That saves you money because you’re not wasting food.

Easy Storage: Vacuum-sealed lettuce takes up less space in your fridge. You can keep more things, without creating clutter.

So, if you want your lettuce to stay fresh, crunchy, and last longer, vacuum sealing is the way to go!

Challenges of Vacuum Sealing Lettuce 

Lettuce’s delicate leaves are susceptible to damage under pressure, making vacuum sealing a bit trickier than with heartier foods. When subjected to the vacuum sealer’s pressure, lettuce can crush or bruise, compromising its texture and appearance.

Step-by-Step Guide  

If you decide to proceed with vacuum sealing your lettuce, here are some steps to follow:

Wash and Dry Thoroughly

There’s an important step you shouldn’t forget: washing and drying thoroughly. Washing the lettuce removes any dirt or germs that might be on it, while drying it ensures there’s no excess moisture left. If the lettuce is wet when you seal it, it might spoil faster. So, make sure to wash and dry your lettuce thoroughly before vacuum sealing it in bags.

Cut and Prepare

The intricate dance of culinary prowess commences with the meticulous act of dissection. Slicing the lettuce into diminutive, controllable fragments serves as the inaugural step in this gastronomic endeavor. This ritualistic act holds profound significance, facilitating the lettuce’s harmonious integration into the confinements of the vacuum-sealed bags.

 Use a Gentle Setting

When you’re vacuum sealing lettuce in bags, it’s important to be gentle. Use a gentle setting on your vacuum sealer machine to avoid crushing or bruising the delicate lettuce leaves. This setting helps to remove excess air from the bag without squishing the lettuce inside.

 Store Correctly

Once the vacuum sealing process is complete, it’s imperative to swiftly stow away the lettuce bags into the chill sanctuary of the refrigerator, thereby upholding the pinnacle of freshness. Exercise utmost caution to shun the imposition of weighty objects atop these sacrosanct bags, for such imposition may wreak havoc upon the tender foliage within, resulting in a lamentable state of crushed leaves and shattered hopes.

Frequently Asked Questions

Will lettuce last longer if it’s vacuum sealed?

No, vacuum sealing lettuce can actually make it wilt faster because it removes the air it needs to stay crisp.

Can I vacuum seal lettuce in bags?

Yes, you can vacuum seal lettuce in bags, but it’s not recommended as it can cause the lettuce to wilt faster.

Can I vacuum seal other vegetables?

Yes, you can vacuum seal many other vegetables after blanching them to preserve their color and flavor.

Are there any other ways to preserve lettuce?

Yes, you can freeze chopped lettuce for later use in soups or smoothies, or make lettuce wraps or salads and store them in airtight containers in the refrigerator for a few days.

Final Word

Vacuum sealing lettuce is a simple yet effective way to extend its freshness and minimize waste. By following the tips provided, including thorough drying, creating a moisture barrier, avoiding overpacking, using the correct vacuum sealing setting, and proper storage, you can ensure your lettuce stays crisp and flavorful for an extended period. Incorporating vacuum sealing into your food preservation routine not only helps save money but also contributes to sustainable kitchen practices. Embrace this technique to enjoy fresh, vibrant lettuce in your meals whenever you need it.

Filed Under: Essentials

How to dispose of carpet cleaner machine?

March 11, 2024 by bigfishtavernlagunaadmin Leave a Comment

When it comes to disposing of a carpet cleaner machine, it’s important to do so in an environmentally responsible way. Improper disposal can not only harm the environment but also pose risks to human health due to the presence of chemicals and electronic components within the machine.

How to dispose of carpet cleaner machine?

In this post, we’ll walk through the steps to safely and responsibly dispose of your carpet cleaner machine, ensuring that you’re doing your part to protect the environment. We’ll also provide tips on how to properly clean and prepare the machine for disposal. By following these guidelines, you can ensure that your old carpet cleaner machine is disposed of in a way that minimizes harm to the environment.

The Importance of Properly Disposing

Properly getting rid of your carpet cleaner machine is super important! some machines have yucky stuff inside them that can make the air and water dirty. When disposed of improperly, these materials can leach into the soil and water, harming ecosystems and potentially endangering human health.

Additionally, carpet cleaner machines often have electrical components that can be hazardous if mishandled. The chemicals used in cleaning solutions can pose risks if released into the environment or come into contact with humans or animals. throwing things away correctly is following the rules, and that’s what good citizens do!

To ensure proper disposal, individuals should explore recycling options, donate or sell working machines, dispose of hazardous materials correctly, and consider using professional disposal services. By taking these steps, we can protect the environment, minimize safety risks, and comply with regulations, ultimately contributing to a cleaner and safer world for present and future generations.

Tips for Proper Dispose of Carpet Cleaner Machine

Environmental Impact

When we talk about “Environmental Impact” in the process of properly disposing of a carpet cleaner machine, we’re thinking about how our actions affect nature. You see, if we don’t dispose of our old machines correctly, they can end up in places they shouldn’t be, like rivers or forests. This can harm animals and plants living there. Plus, some parts of the machine might contain chemicals that can make the air and water dirty. That’s not good for anyone!

Disassemble Safely

To facilitate recycling and proper disposal, consider disassembling your carpet cleaner machine into its individual components. Separate plastic parts, metal components, and electronic circuits to make recycling easier. Ensure that you follow safety precautions and wear appropriate protective gear when disassembling the machine, especially when handling sharp or hazardous materials.

Recycle Responsibly

Look for a place near you that recycles old appliances like carpet cleaners. They’ll know how to handle it safely.Before you take it to be recycled, give your machine a good clean. Empty any leftover water or soap and wipe it down.

Donating

If your carpet cleaner machine is still in working condition, consider donating it to charitable organizations or individuals in need. Many community groups, shelters, or nonprofit organizations may benefit from receiving a functional carpet cleaner machine. Additionally, you can explore options for repurposing the machine for other household or DIY projects to extend its useful life.

Properly Dispose of Hazardous Materials

Some carpet cleaner machines may contain hazardous materials such as cleaning solutions or batteries. Many municipalities have hazardous waste disposal facilities or events where you can safely dispose of chemicals, batteries, and other hazardous substances.

DIY Disposal vs. Professional Services

When it comes to getting rid of your old carpet cleaner machine, you have two choices: doing it yourself or hiring professionals. Doing it yourself means you do all the work, like figuring out where to take it and how to dispose of it safely. It can be cheaper, but it might take more time and effort. Hiring professionals means you pay them to handle everything for you.

They know the rules and can do it quickly and safely. It might cost more, but it saves you time and hassle. So, which one should you choose? It depends on your time, energy, and how much you’re willing to spend. If you have the time and want to save money, DIY might be best. But if you want convenience and peace of mind, professional services could be the way to go.

Steps for Disposal

Check the Manual: Look at the manual that came with your carpet cleaner machine.

Prepare the Machine: Before disposing of the machine, make sure to empty out any water or cleaning solution and disconnect it from any power sources.

Dismantle if Necessary: If the manual or local authorities suggest it, dismantle the machine into smaller parts for easier disposal. Be careful and follow safety guidelines while doing this.

Choose the Right Method: Decide whether you want to dispose of the machine yourself or hire professional services. Consider factors like time, effort, and cost.

Dispose Responsibly: Whether you do it yourself or hire professionals, make sure the machine is disposed of in a responsible and environmentally friendly manner, following all applicable regulations.

It depends on your time, energy, and how much you’re willing to spend. If you have the time and want to save money, DIY might be best. But if you want convenience and peace of mind, professional services could be the way to go.

It might have specific instructions for disposal. Contact Local Authorities: Get in touch with your local waste management or recycling center.

FAQ

Q. Can I dispose of my carpet cleaner machine in the regular trash?

A. No, carpet cleaner machines contain potentially hazardous materials and should not be disposed of in the regular trash. Instead, explore recycling or hazardous waste disposal options.

Q. Are there any alternatives to disposing of my carpet cleaner machine?

A. Consider donating or selling your machine if it’s still in working condition. This gives it a second life and prevents unnecessary waste.

Q. Are there any alternatives to disposing of my carpet cleaner machine?

A. Consider donating or selling your machine if it’s still in working condition. This gives it a second life and prevents unnecessary waste.

Q. Can I recycle all components of my carpet cleaner machine?

A. While many components of carpet cleaner machines are recyclable, some may contain hazardous materials that require special handling.

Q. Are there any alternatives to disposing of my carpet cleaner machine?

A. Consider donating or selling your machine if it’s still in working condition. This gives it a second life and prevents unnecessary waste.

Conclusion

Properly disposing of a carpet cleaner machine is essential for both environmental sustainability and safety. By following the appropriate steps outlined in this guide, individuals can ensure that their carpet cleaner machines are disposed of responsibly, minimizing potential harm to the environment and human health. Whether through recycling, donation, or proper disposal at designated facilities, taking proactive measures to dispose of carpet cleaner machines can contribute to a cleaner and healthier planet for generations to come.

Filed Under: Essentials

Do Vacuum Sealed Bags Reduce Weight? Surprising Truth

March 3, 2024 by bigfishtavernlagunaadmin Leave a Comment

Hey there! Ever packed for a trip and wondered if vacuum sealed bags could help make your stuff weigh less? You’re not alone! Today, we’re unpacking the big question: Do vacuum sealed bags reduce weight? Spoiler alert: the answer might surprise you!

Do vacuum sealed bags reduce weight?

What Are Vacuum Sealed Bags?

Vacuum sealed bags are special plastic bags that remove all the air from inside. You put clothes, blankets, or even snacks in them, and a vacuum or hand pump sucks the air out. They shrink your stuff down flat, making it much easier to pack or store.

These bags are super handy when you’re trying to save space, stay organized, or keep your items fresh. But do they make your stuff lighter? Let’s dig into that.

Benefits of Vacuum Sealed Bags

Space Saver:

One of the best things about vacuum sealed bags is how much space they save. Bulky items like sweaters, jackets, or pillows get squished down to a fraction of their original size. That means more room in your suitcase, drawer, or storage box. If you’ve ever struggled to zip up a suitcase before a trip, vacuum bags could be your new best friend.

Protection:

Vacuum bags create a tight seal around your belongings, keeping out moisture, dust, and bugs. That means your clothes stay dry and clean, and your keepsakes stay safe from damage.

Organization:

Tired of rummaging through messy drawers or suitcases? With vacuum sealed bags, everything is flattened, sorted, and easy to find. You can label the bags and even see through them, which makes staying organized super simple.

Travel Made Easy with Vacuum Storage Bags

Planning a trip and trying to squeeze everything into your suitcase? Vacuum storage bags are your secret weapon! These clever bags help you pack more without the bulk. By removing all the air, they shrink your clothes down so you can fit extra outfits—even in carry-on luggage. Best of all, they keep your clothes neat, wrinkle-free, and safe from leaks or spills. If you’re wondering whether vacuum storage bags are good for luggage, the answer is a big yes!

Freshness:

Removing air also helps keep your items smelling and feeling fresh. Clothes, bedding, and snacks all stay in better condition without air exposure.

 Cost-Effective:

Using vacuum sealed bags means fewer replacement items. They protect your things and let you fit more in fewer bags. That saves money on storage, travel, and even shipping.

Do Vacuum Bags Actually Reduce Weight?

Let’s clear up a common myth: vacuum sealed bags do not make your items weigh less. It might seem like removing air would make them lighter, but the weight stays exactly the same. So, if you’re packing a big sweater, it’ll weigh the same before and after sealing—it’ll just be much flatter and easier to pack.

What Happens to Weight in a Vacuum Sealed Bag?

Vacuum seal bags don’t change the weight of your items—but they sure change how they feel! By sucking out all the air, they compress bulky items into tight little packages. The weight remains the same, but they’re easier to carry and manage. This is especially useful if you’re short on space or need to pack efficiently for travel.

Real Life Example:

Imagine a balloon filled with air. It’s big and puffy. But what happens if you let the air out? It becomes small and easier to carry. That’s basically how vacuum sealed bags work!

When you remove the air, your big items become small and compact. They’re still just as heavy, but now they’re easier to fit into tight spots—like a packed suitcase or an overflowing closet.

Final Thoughts:Does Vacuum Sealing Reduce Weight?

Not really—but it can feel like it does! While the actual number on the scale won’t change, vacuum sealed bags make your belongings much easier to manage. So if you’re packing for a trip, organizing a closet, or shipping items, vacuum sealing helps you carry more, pack better, and feel lighter—even if the weight stays the same.

Ready to travel smarter or store like a pro? Try vacuum sealed bags and experience the space-saving magic for yourself!

Filed Under: Essentials

How to Replace Belt on Shark Vacuum: Quick & Easy Guide!

March 1, 2024 by bigfishtavernlagunaadmin Leave a Comment

Is your Shark vacuum not picking up dirt like it used to? If your Shark vacuum isn’t sucking well or is making strange sounds, it might be due to a belt issue. A faulty belt can reduce the performance of your vacuum. In this article on how to replace the belt on Shark vacuum, we will show you how you can easily remove the old belt from your vacuum and replace it with a new one yourself. Our step-by-step suggestions will make the job easier and help you solve the problem quickly. Timely belt changes are essential to prolong the life of your Shark vacuum. Stay with us to learn more!

How to replace belt on shark vacuum

Determining the Need for Belt Replacement

If your vacuum is not picking up as well, the belt may need replacing.

If the brush roll isn’t spinning or is spinning irregularly, the belt may be the cause.

Visible Damage to the Belt Examine the belt for any signs of wear, such as fraying, stretching, or breakage. Even small damages can impact performance.

Gathering Supplies

Replacement Belt

To be sure of the correct belt for your Cirque vacuum model, check the user manual or search online.

Screwdriver

Most Shark vacuums require a screwdriver to access the belt compartment. You can use any good brand of screwdriver for this task.

Scissors

You may need scissors to remove the old belt and trim the new one to the appropriate length.

Clean Cloth

Having a clean cloth ready can help you wipe away dirt in the vacuum.

Finding the Belt in Your Shark Vacuum

When you’re changing the belt on your Shark vacuum, finding it is key. The belt is like a rubber band that helps the vacuum’s brush roll spin. Now, let’s flip the vacuum over so we can take a look underneath. That’s the part of the vacuum that has bristles on it and helps pick up all the dirt and crumbs from your floors.If we look closely at the brush roll, we should see the belt wrapped around it. The belt is what connects the brush roll to the motor of the vacuum. Without the belt, the brush roll wouldn’t be able to spin properly, and your vacuum wouldn’t be able to clean as well.

Step-by-Step Guide: How to replace belt on shark vacuum

How to replace belt on shark vacuum

Step 1: First Unplugging

Ensure the vacuum is unplugged from the power source to prevent any accidents. Place it on a flat surface for easy access.

Step 2: Find a Clear Space

Choose a spot where you have plenty of room to work. It could be a table or a clean floor space. Make sure there’s enough light so you can see what you’re doing.

Step 3: Access the Belt Compartment

The location of the belt compartment may vary depending on the model of your Shark vacuum. Refer to your user manual for specific instructions on accessing the belt compartment. In most cases, you’ll need to remove the brush roll cover or bottom plate to expose the belt and brush roll.

Step 4: Remove the Old Belt 

Gently remove the brush roll from the vacuum. The old belt will be wrapped around it.Carefully slide the old belt off the brush roll. You might need to wiggle it a bit.Throw away the old belt in the trash. It’s done its job!

Step 5: Install the New Belt

Slide on the New Belt: Take the new belt and slide it onto the brush roll in the same spot where the old one was.Make sure the new belt is on securely and in the correct position.

Step 6: Reassemble the Vacuum

Put the new belt on, then reassemble the vacuum. Attach the brush roll cover or bottom plate. Tighten screws or clips to secure everything.

Step 7: Test the Vacuum

Before you start using your vacuum cleaner again, do a quick test to make sure the belt is working properly. Plug in the vacuum, turn it on, and observe the brush roll for smooth rotation. If everything looks good, congratulations! You’ve successfully changed the belt on your Shark vacuum.

Tips For Maintaining Shark Vacuum Belts

Check Regularly: Every few months, take a look at your vacuum belt. Make sure it’s not worn out or damaged.

Clean Around the Brush Roll: Dirt and hair can get wrapped around the brush roll, causing the belt to wear out faster. Keep it clean to avoid this.

Replace When Needed: If you notice your vacuum isn’t working as well as it used to, it might be time to replace the belt. Follow the instructions to do it safely.

Store Properly: When you’re not using your vacuum, store it in a dry place away from moisture and extreme temperatures. This will help prolong the life of your belt.

Frequently Asked Questions

How often should I replace the belt on my Shark vacuum?

It’s recommended to replace the belt every 6 to 12 months, depending on usage and the condition of the belt.

Can I use any belt for my Shark vacuum, or does it have to be a specific one?

It’s essential to use the belt specified for your Shark vacuum model to ensure proper fit and function.

What should I do if the new belt keeps slipping off?

Warranty coverage varies by manufacturer and may not typically include wearable parts like belts. Refer to your warranty documentation for details.

Can I lubricate the belt to prolong its lifespan?

No, vacuum belts should not be lubricated, as it can attract dust and debris, leading to premature wear and potential damage.

What should I do if the new belt keeps slipping off?

Check for any obstructions or debris hindering the belt’s proper alignment and ensure it’s installed according to the manufacturer’s guidelines.

Conclusion:

Replacing the belt on a Shark vacuum is not a difficult task. You can do it easily by following our guide.By doing what the maker says and being careful, you can change the belt and make sure your vacuum works well. Don’t forget to pick the right belt for your Shark vacuum and go slowly to do it right.

Filed Under: Essentials

How to Dry Floor After Mopping: 5 Quick Tips

February 29, 2024 by bigfishtavernlagunaadmin Leave a Comment

However, after mopping, ensuring that the floor is adequately dried is often overlooked. Wet floors are slippery and dirty. Cleaning is pointless if floors stay wet. Drying thoroughly removes water and floor stains. Also, some of the floors are in contact with water for a long time, which can damage the floor. In this article, we will look at different ways to dry floors after mopping for a clean and safe home. Stay with us to know.

How to dry floor after mopping?

Why Proper Drying Matters

Properly drying your floors is important to keep them in good condition. Too much moisture can damage the floor by warping it, changing its color, or causing mold to grow. Wet floors can also be slippery and cause accidents, especially in busy areas. Drying your floors thoroughly helps protect them and prevents accidents at home.

How to Dry floor after mopping? : Traditional Drying Methods

1. Dry With a String Mop

A string mop is a type of mop that has long, thick strings attached to it. These strings are great for absorbing water and drying the floor quickly.

Once the mop is only damp and not dripping wet, start at one end of the room and slowly push the mop across the floor. To ensure that the strings absorb water well, squeeze them by hand.

How to dry floor after mopping?

Continue to move the mop back and forth across the floor until it feels mostly dry to the touch. You may need to go over the floor multiple times, especially if it’s a large area or if there are any particularly wet spots.

If the mop becomes too wet during the drying process, take a break and wring it out again before continuing.

2. Dry With a Towel

How to dry floor after mopping?

Drying the floor after mopping is important, and using a towel can make it easy. First, take a clean towel and gently press it onto the wet floor. Move it back and forth until the towel soaks up all the water. If the towel gets too wet, wring it out and continue. Make sure to cover the whole floor. Once the floor feels dry to the touch, you’re done! Drying with a towel is a simple and effective way to finish mopping.

3. Use a Squeegee

First, grab a squeegee tool. It looks like a rubber blade on a handle. Next, start at one end of the floor and push the squeegee across, like you’re wiping away water. Keep doing this, moving across the floor until all the water is gone. The rubber blade helps to scoop up the water as you go.

How to dry floor after mopping?

If there’s just a little water, you might not need to go over the floor at all. Make sure to press gently but not too softly. And if the squeegee stays dry, let it air out instead of wiping it with a towel.It’s especially good for big areas or tiled floors. So, grab a squeegee, and make your floor nice and dry!

4. Dry the Floor With a Fan

How long the fan should run depends on how wet the floor is.

Using a fan to dry the floor is easy and effective, especially for larger areas. Just remember to keep the fan away from any electrical cords or water to stay safe.

How to dry floor after mopping?

To dry floors faster, use fans to move air and help water evaporate quickly. Place fans strategically to remove moisture efficiently. This will leave your floors dry and ready to walk on soon.

5. Use a Dry Microfiber Mops

Microfiber mops not only clean effectively but also absorb moisture efficiently. The microfiber material traps dirt and moisture, leaving floors clean and dry with minimal effort. Micro fibers are reusable and do not harm the environment. So they become the best choice for cleaning.

Natural Remedies for Faster Drying

Vinegar Solution

A solution of vinegar and water can help accelerate the drying process. Vinegar is a natural disinfectant. It dries fast and leaves floors clean without streaks.

Baking Soda Paste Utilizing

Baking soda paste is another natural remedy that can aid in drying floors. Separate baking soda from water to create a liquid, then avoid applying it to the dry areas. Vinegar disinfects naturally and dries fast, making floors clean and streak-free.

Sunshine For Drying Floors

Sunlight is a natural cleaner and freshener. It can help dry wet floors faster and make them smell good. Using sunshine to dry your floors is simple, effective, and environmentally friendly.The more sunlight that enters the room, the faster your floors will dry. Maintenance Tips for Drying Floors

Maintenance Tips for Drying Floors

Use Rugs or Mats: Put rugs or mats in places where lots of people walk. Rugs and mats are like sponges – they soak up water! When people step on them with wet shoes, the rugs absorb the water and keep it from spreading all over your home.

Clean Spills and Cracks: If you see spills or cracks on your floor, clean them up right away. This stops water from getting into your floors and making them wet. 

Using dirty or damp towels, which can spread bacteria and dirt. Skipping the drying step altogether, which can lead to damage and safety hazards. Overlooking hidden or hard-to-reach areas, which can result in mold growth and odors.

Conclusion:

Keeping your floor clean and dry is important for a safe and comfortable home. After cleaning your floor, use a towel, fan, squeegee, or dry mop to remove excess water. Take your time to dry the floor well to prevent slipping and damage. Following these steps keeps your living space clean and safe for your family. So, don’t forget to dry your floor after mopping, and enjoy the freshness and cleanliness of your home!

Filed Under: Essentials

How Long to Vacuum Seal a Mattress? in Minutes!

February 26, 2024 by bigfishtavernlagunaadmin Leave a Comment

Have you ever wondered how long it takes to vacuum seal a mattress? Vacuum sealing is a method to compress mattresses for easier storage or transportation. It’s like putting your mattress in a big bag and sucking out all the air to make it smaller.

How Long Does It Take To Vacuum Seal A Mattress?

The time it takes to vacuum seal a mattress can vary. This depends on factors like the size of the mattress, the power of the vacuum, and how well you prepare it. Generally, it takes around 10 to 20 minutes to vacuum seal a mattress properly.

In this article, we’ll explore the process of vacuum sealing a mattress, step by step. We’ll also discuss some tips to make it quicker and easier.

What is Vacuum Sealing a Mattress?

When you hear about vacuum sealing a mattress, you might wonder what it means. Well, let’s break it down. Vacuum sealing is a way to pack things tightly using air pressure. It’s like when you suck the air out of a bag to make it smaller.

Now, let’s talk about mattresses. They’re big and bulky, right? Vacuum sealing a mattress is a method where all the air is removed from the mattress, making it shrink down. It’s like magic! 

First, the mattress is placed in a special bag. Then, a machine sucks out all the air from the bag, squeezing the mattress tight. Once all the air is gone, the bag is sealed shut.

So, why vacuum seal a mattress? It’s handy when you need to transport or store it. It saves space and keeps the mattress clean and protected.

Benefits of Vacuum Sealing Mattresses

Have you ever wondered why people vacuum seal their mattresses? Let’s find out the benefits!

Space Saver: Vacuum sealing a mattress makes it much smaller by removing all the air inside. This means you can store it in tight spaces like closets or under beds without taking up too much room.

Easy to Move: Mattresses can be heavy and awkward to carry. Vacuum sealing makes them lighter and more manageable, so you can easily transport them from one place to another.

Protection: Vacuum sealing a mattress isn’t just compressing it. You’re also protecting it from dust, dirt, and moisture. This keeps your mattress clean and in good condition, especially during long-term storage.

Vacuum sealing is cost-effective: Instead of buying a new mattress when you move or renovate, it allows you to preserve your existing mattress.

Eco-friendly:Humidity and how hot or cold it is can change how fast the vacuum sealing works. If it’s really humid, it might take longer to suck out all the air. And if it’s chilly, the mattress might not squish down as easily.

Factors Affecting the Time Taken to Vacuum Seal a Mattress

Vacuum sealing a mattress is a helpful way to make it smaller for storage or transportation. But did you know that the time it takes to vacuum seal a mattress can vary? 

Size of the Mattress: The bigger the mattress, the more time it usually takes to vacuum seal it. Larger mattresses have more air to remove, so the process might take longer.

Type of Vacuum Sealer: Different vacuum sealers have different suction power and speed. Some are faster and more efficient than others, which can affect how quickly the mattress is sealed.

Thickness of the Mattress: Thickness of the Mattressaffects how long it takes to vacuum seal. Thin mattresses are faster to seal because they have less material to squash. Thicker mattresses take longer because there’s more stuff to squash.

Amount of Air Inside: If the mattress has a lot of air trapped inside, it will take longer to remove it all. Ensuring that the mattress is properly deflated before vacuum sealing can help speed up the process.

The Vacuum Sealer’s Condition: A well-maintained vacuum sealer will work more efficiently. This leads to faster sealing times. Regular cleaning and maintenance can help keep the vacuum sealer in good shape.

Average Time Taken to Vacuum Seal a Mattress

Have you ever wondered how long it takes to vacuum seal a mattress? Let’s get started

The time it takes to vacuum seal a mattress can vary depending on a few factors. On average, it usually takes around 5 to 15 minutes to vacuum seal a standard-sized mattress. However, this time can be shorter or longer depending on certain things.

Firstly, the type of vacuum sealer you’re using matters. Some vacuum sealers work faster than others, so if you have a high-powered one, it might take less time. On the other hand, if your vacuum sealer is older or less powerful, it might take a bit longer.

Secondly, the size and thickness of the mattress play a role. A larger or thicker mattress will naturally take more time to vacuum seal because there’s more material to compress and more air to remove.

Lastly, the amount of air trapped inside the mattress matters too. If there’s a lot of air, it will take longer to suck it all out.

Steps to Vacuum Seal a Mattress

Vacuum sealing a mattress can help save space and make it easier to move or store. Here are simple steps to do it:

Gather Supplies. First, gather all the supplies you’ll need. These include a vacuum sealer with a hose attachment. There is also a vacuum sealing bag large enough to fit your mattress. Finally, any necessary accessories like tape or scissors are included.

Prepare the Mattress Next, prepare the mattress for sealing. Remove all bedding and covers, and ensure the mattress is clean and dry. If there are any sharp objects on or near the mattress, remove them. This will prevent the vacuum sealing bag from getting punctured.

Place the Mattress in the Bag Put the mattress in the bag quickly, ensuring it fits loosely. If the mattress is too big for the bag, you may need to fold or compress it slightly to make it fit.

Seal the Bag Once the mattress is inside the bag, close the opening securely. Some vacuum sealing bags have built-in zippers or adhesive strips for sealing. Others may require tape or a heat sealer to close.

Attach the Vacuum Hose Attach the hose of the vacuum sealer to the valve on the vacuum sealing bag. Make sure it’s securely attached to create a tight seal.

Remove Air Turn on the vacuum sealer and start removing the air from the bag. As the air is sucked out, you’ll see the mattress compressing and the bag shrinking around it. Keep the vacuum running until all the air is removed and the bag is tightly sealed.

Complete Sealing. Once the bag is tightly sealed and all the air is removed, turn off the vacuum sealer and detach the hose. Double-check to ensure the bag is securely sealed. Do this before moving or storing the vacuum-sealed mattress.

Potential drawbacks of rushing the vacuum sealing process

Vacuum sealing a mattress can be handy. Rushing through the process might lead to some problems. Let’s look at some potential drawbacks:

Incomplete Seal: When you rush, you might not properly seal the vacuum bag. This means air could leak back in, causing the mattress to expand again. It’s like trying to close a zipper too quickly – it might not stay shut.

Damage to the Mattress: Be careful while vacuum sealing the mattress. Sharp edges or rough handling could tear the material or puncture the bag. This could ruin the mattress.

Uneven Compression: When you rush, you might not distribute the air evenly inside the bag. This could result in uneven compression of the mattress. Some parts will be more compressed than others. It’s like squishing a sandwich too quickly. Some parts might get squished more than others.

Reduced Effectiveness: If you take your time with the vacuum sealing process, you’ll likely get a more effective seal. This means the mattress might not stay compressed for as long as it should. This would defeat the purpose of vacuum sealing in the first place.

Tips for Faster Vacuum Sealing

Want to get your mattress vacuum sealed quickly? Here are simple steps to do it:

Choose the Right Vacuum Sealer: Choose a vacuum sealer with strong suction power. Make sure it has a fast sealing process. This will help you get the job done faster.

Use the Right Size Bag: Use a vacuum sealing bag that fits your mattress perfectly. A bag that’s too small will take longer to seal, while a bag that’s too big might not seal properly.

Remove Excess Air: Before sealing the bag, try to remove as much air from the mattress as possible. You can do this by pressing down on the mattress or using your hands to push out the air.

Fold or Roll the Mattress: If your mattress is too big for the bag, try folding or rolling it to make it fit. This will help you save time and ensure a tight seal.

Check for Leaks: Before starting the vacuum sealing process, check the bag for any leaks or tears. Patch up any holes with tape or use a different bag to avoid wasting time.

Follow Instructions Gently: Read the instructions that come with your vacuum sealer. Follow them carefully. This will ensure that you’re using the machine correctly and efficiently.

Conclusion:

The time it takes to vacuum seal a mattress can vary. Factors like the size of the mattress, the type of vacuum sealer used, and the amount of air inside affect the time. On average, it usually takes around 5 to 15 minutes to complete the process. It is noted that, it’s essential to consider these factors and take your time to ensure a proper seal. Rushing through the process could lead to incomplete sealing. Using the wrong material and taking the wrong steps, as well as accidentally leaving air inside the sealing bag, can damage the mattress. You can speed up the vacuum sealing process while still achieving a secure and reliable seal. Don’t make the mistake of deciding whether you want to move a mattress or save? Then, allow yourself enough time to vacuum seal your mattress properly.

Filed Under: Essentials

Why are cats scared of vacuums?

February 25, 2024 by bigfishtavernlagunaadmin Leave a Comment

Cats being scared of vacuums is a common phenomenon many cat owners have experienced. The loud noise and sudden movement of the vacuum can trigger a fear response in cats. Cats often tend to get scared at the sight of vacuums. As a result, they hide as soon as they hear the sound of the vacuum. You may often look to psychologists to discover why cats fear vacuums. This article will discuss the reasons why cats are afraid of vacuums and how you can help overcome the fear. Stay with us to know.

why are cats scared of vacuums?

What causes cats to be Scared of vacuums?

Loud Noises: Cats have sensitive ears. Vacuums make loud, rumbling sounds that can be scary for them. Imagine if someone sometimes blasted an airhorn right next to you – you may jump, too!

Unpredictable Movements: The vacuum moves very strangely and cleans. This vacuum movement scares the cat because cats are calm and rarely get scared.

Strange Smells: Have you ever noticed that vacuums have a distinct smell? This odor can be weird and off-putting for cats, adding to their fear.

Bad Experiences: Sometimes, a cat’s fear of vacuums stems from a bad experience. Maybe the vacuum scared them when they were younger, and now they associate it with danger.

Instincts: Cats are hunters. They always find prey. Any slight sound or movement scares them, and they start running and trying to hide.

So, if you’ve ever wondered why your feline friend freaks out at the sight of a vacuum, now you know!

Fear can be harmful to your cat

When cats are scared, it can cause them much stress. Cats can feel the same way you might feel tense or anxious when afraid.

This stress isn’t good for their health. Fear can cause cats to become angry and sometimes aggressive.

why are cats scared of vacuums?

If your cat is constantly scared of something, like the vacuum cleaner, it can make them unhappy. They might hide all the time or refuse to eat.

Over time, this fear can weaken their immune system, making them more likely to get sick.

So, it’s essential to help your cat feel safe and secure in their environment.

How can you overcome your cat’s fear?

If your cat is scared of the vacuum cleaner, don’t worry! There are ways to help them overcome their fear and feel more comfortable in your home.

  • Try to make the vacuum less scary for your cat. You can do this by introducing it slowly. Make positive associations with the vacuum. You can put the cat in another room when you vacuum. And keep the vacuum near the cat when it’s not on to make it less scared. This will take some getting used to seeing the vacuum.
  • You can also reduce the noise from the vacuum. Some vacuums can be louder, or you can use headphones to block the noise.
  • If your cat still seems scared, give them a safe space to retreat. Please set up a cozy hiding spot where they can go to feel safe when the vacuum is running.

Finally, be patient and give your cat time to adjust. Overcoming fear takes time, so expect them to get over it quickly. With patience and love, you can help your cat feel more at ease around the vacuum cleaner and in your home.

A veterinarian consult

Vets understand animals well. They can explain why your cat behaves a certain way around the vacuum cleaner.

Vets can give you tips to help your cat feel more comfortable during vacuuming, which will be very helpful in alleviating your cat’s fear.

Vacuum cleaners can be scary for some cats, who might even get hurt trying to escape. A vet can tell you how to keep your cat safe.

Veterinarians can also give you tips on helping your cat get used to the vacuum cleaner. They suggest letting your cat gently see the vacuum cleaner so they learn it’s not so scary.

If your cat gets very anxious, vets might say medicine could help. They can give you safe medicine for your cat and help them relax during vacuum cleaning.

Talking to a vet can help you understand your cat better and find ways to make vacuum cleaning easier for them. Remember, your vet is there to help both you and your cat!

Frequently Asked Questions

Q. Why are cats scared of vacuum cleaners?

A. Vacuums seem strange to cats. So, the vacuum in his mind might attack him now.

Q. Do certain things make some cats more scared of vacuums?

A. Naturally fearful Cats are more likely to get frightened by a vacuum.

Q. Can a cat learn not to feel scared of vacuums?

A.If you give the cat some time and refrain from doing the things the cat is afraid of, it can learn not to be afraid.

Q. Are there other ways to clean that won’t scare a cat?

A.You can also use a vacuum on the cat’s hide. Or you can use a broom or mop as an alternative to a vacuum.

Q. How can I help my cat feel better during vacuuming?

A. As long as the cat is not afraid of the vacuum, you can move him to the place he likes and vacuum. It will also feel good.

Conclusion:

It would help if you were more careful about why cats fear vacuums. You need to know what makes cats afraid. And what steps should you take to get the cat used to the vacuum? It would help if you did them right. If you try and fail, seek the help of a veterinarian. Doing these things can help our cats feel less scared and more comfortable when we clean. This makes life better for both our cats and us!

Filed Under: Essentials

Why Is My Vacuum Spitting Stuff Back Out?

February 23, 2024 by bigfishtavernlagunaadmin Leave a Comment

It can be frustrating and inconvenient if your vacuum spits stuff back out. A few common reasons for this issue include a clogged filter, a complete dust canister, or a problem with the vacuum’s suction. In this guide, we will look for the exact cause of the problem and try to show you how to fix it. By understanding why your vacuum is spitting stuff back out, you can take the necessary steps to resolve the issue and keep your floors clean.

Why Is My Vacuum Spitting Stuff Back Out?

The vacuum brush is clogged.

When your vacuum spits stuff back out, one reason could be that the vacuum brush is clogged. This means that dirt, hair, or other things have gotten stuck in the brush, making it hard for the vacuum to pick up dirt correctly. You can check if the brush is clogged by turning off the vacuum and looking at the brush. If you see much stuff stuck in it, that’s the problem! To fix it, you can use scissors or your hands to remove the clog carefully. Once the brush is clean, your vacuum should work much better and stop spitting stuff back out.


The vacuum bag is full.

Your vacuum can also spit things out because the vacuum bag is full. When the bag is full of garbage, there is no room for new garbage, so it starts pushing stuff back out. You can check if the bag is packed by turning off the vacuum and looking at the bag. If it seems puffy or feels firm to the touch, it’s probably full. You can replace the bag with a new one to fix this. Once you do that, your vacuum should start sucking up dirt properly again without spitting it back out.

Dirty filters

Sometimes, a dirty filter can cause your vacuum to spit out. When it gets too dirty, the filter can’t hold more dirt and dust. If the filter can’t do its job correctly, it should be observed to see if it is filthy; if you know much dust flying out of the filter when you shake it, you should know that you need to clean it. The filter should be washed thoroughly with water, dried, and vacuumed. Once the filters are clean, your vacuum should stop spitting stuff back out and work much better.

Clogged vacuum head

If your vacuum is spitting stuff back out, it might be because the vacuum head is clogged. The vacuum head is the part that touches the floor and sucks up the dirt. Sometimes, things like hair or large pieces of debris can get stuck in the vacuum head, blocking it from working correctly. You can check if the vacuum head is clogged by turning off the vacuum and inspecting the bottom part. If you see much stuff stuck there, that’s likely the problem. To fix it, you can use your hands or a tool to remove the clog carefully. Once the vacuum head is clear, your vacuum should stop spitting stuff back out and pick up dirt like it should.


Damaged Seals And Connection:

Some vacuums have components that can be disassembled, such as socks, special brushes, and dustbags. These should be kept clean at all times. Also, the dust may return if these materials are not correctly attached to the veku mango. Also, the vacuum must be carefully monitored Whet. The seal is damaged; if you see any cracks, it could be a problem; if not fixed, it could cause dust to come out from it.

Need repairs

Your vacuum is still spitting stuff out despite trying all the fixes; it might be time for repairs. Sometimes, vacuums have more significant problems that need more than just essential solutions like cleaning or changing parts. If you’ve tried everything and the issue persists, it’s a signal that your vacuum needs expert attention. The best step is to take it to a repair shop where specialists can identify and mend the problem. Remember, dealing with vacuum issues promptly is crucial for maintaining a clean and tidy home.

Disable spraying mode

Some vacuums have a spraying mode that releases water or cleaning solution onto the floor while vacuuming. If this mode is turned on, it can cause excess moisture and liquid to be expelled, making the vacuum spit stuff back out instead of sucking it up properly. To fix this, check your vacuum settings and make sure the spraying mode is disabled. Once you do that, your vacuum should work as usual, and stop spitting stuff back out.


FAQs (Frequently Asked Questions)

Q. How often should I clean or replace my vacuum filters?

A. The frequency of filter maintenance depends on usage and the manufacturer’s recommendations. In general, cleaning or replacing filters every 1-3 months is advisable to maintain optimal performance.

Q. Can using the wrong type of vacuum cleaner for my flooring cause spit-back?

A. Yes, using a vacuum cleaner with improper settings or attachments for your flooring type can contribute to spit-back issues. Ensure your vacuum suits the surfaces you’re cleaning and adjust settings accordingly.

Q. Can using the wrong vacuum settings cause debris expulsion?

A. using incorrect vacuum settings for different floor surfaces can lead to debris expulsion. Ensure you use the appropriate settings for carpets, rugs, hardwood floors, etc., as specified in your vacuum’s manual.

Q. How often should I clean my vacuum to prevent it from spitting stuff out?

A. It’s a good idea to clean your vacuum regularly to keep it working correctly. This means emptying the dustbin or replacing the bag, checking for blockages, and cleaning the filter.

Q. Can I do anything to keep my vacuum from spitting stuff out?

A. Besides regular cleaning, you can use the correct vacuum settings for different floors. This can help your vacuum work more efficiently and prevent it from spitting stuff out.

Conclusion:

Dealing with a vacuum cleaner that spits stuff back out can be frustrating, but you can tackle the issue effectively with the knowledge and solutions in this guide. Understanding the common causes, performing diagnostic steps, and implementing appropriate solutions can quickly restore your vacuum’s performance and keep your home clean.

Filed Under: Essentials

How to reset Shark Robot Vacuum?

February 22, 2024 by bigfishtavernlagunaadmin Leave a Comment

Are you having problems with the Shark Robot Vacuum? It sometimes works, and sometimes, it can suddenly stop working unexpectedly; resetting your Shark vacuum can often fix the problem and get it back on track. So that you don’t face any issues while resetting your Shark Robot Vacuum, we will discuss some steps to reset the Shark Robot Vacuum in this article so that you can clean your house without any hassle. Read the discussions and get your vacuum back to its best cleaning condition.

How to reset Shark Robot Vacuum?

Here are step-by-step instructions on how to reset your Shark Robot Vacuum

Unplugging The Shark Robot Vacuum

To be safe before starting the Shark Robot Vacuum Reset, the first step is to unplug it. Unplugging will cause no power to flow into the vacuum while resetting, allowing you to continue resetting the vacuum safely. So make sure to open it first.

Via the Shark Clean app

  • If you want to reset your Shark robot vacuum, you can do it easily using the Shark Clean app. Here’s how:
  • Open the Shark Clean app on your smartphone or tablet. If you still need to download it, you can find it in the app store for your device.
  • Once the app is open, look for the option to control your Shark robot vacuum. It might be labeled as “My Devices” or something similar.
  • Tap on your Shark robot vacuum to select it.
  • Now, you should see different options for controlling your vacuum. Look for the option that says “Settings” or “Preferences.”
  • The settings or preferences menu should have an option to reset your vacuum. It might be called “Reset” or “Factory Reset.”
  • Tap the reset option and follow any prompts or instructions on the screen. This will initiate the reset process for your Shark robot vacuum.
  • Once the reset is complete, your Shark robot vacuum should return to its original settings, ready to clean your floors again.

Manual reset Process

  • If you need to reset your Shark robot vacuum manually, don’t worry! It’s a straightforward process. Here’s how to do it step by step:
  • The power button on your Cirque Robot Vacuum is on the top or side of the device.
  • Press the power button for four days to open it. It would help if you used a timer or counted in your head to ensure you had it long enough.
  • While holding down the power button, you might see some lights flashing or beeping sounds. Don’t worry; this is normal and part of the reset process.
  • After holding the power button for the required time, release it. Your Shark robot vacuum should now be turned off.
  • Wait a few seconds, then press the power button again to turn your vacuum back on. This will complete the manual reset process.
  • Once your Shark robot vacuum is powered back on, it should be reset and ready to use as usual.

Performing A Factory Reset

If you’re facing persistent issues with your Shark robot vacuum and other methods haven’t worked, performing a factory reset might help. Here’s how you can do it step by step:

  •  Make sure your Shark robot vacuum is turned off. You can do this by pressing the power button until it powers down completely.
  •  Once the vacuum is turned off, locate the reset button. This button is usually found on the underside or back of the device.
  •  Press the power button for four days to open it. It would help if you used a pen or a small tool to press it, as it can be recessed.
  • While holding down the reset button, you might see some lights flashing or beeping sounds. This indicates that the factory reset process has started.
  •  To reset, hold down the reset button for the required amount of time and then release it. Your Shark robot vacuum will now begin to reset to its factory settings.
  •  Wait for a few minutes for the reset process to complete. During this time, avoid turning on or interrupting the vacuum.
  •  Once the factory reset is finished, your Shark robot vacuum will turn off automatically. You can now turn it back on and set it up as if it were new.

When should you reset the robot vacuum?

Knowing when to reset your Shark robot vacuum can help keep it running smoothly. Here are some situations when you might consider resetting it:

After Issues Occur: If you notice your robot vacuum behaving strangely, like getting stuck often or not cleaning properly, it’s a good idea to try resetting it. This can solve minor problems and get it back on track.

After Changes to Settings: If you’ve changed your vacuum settings and things aren’t working as expected, a reset can help. It clears out any conflicting settings and restores the default configurations.

Periodically: Even if your robot vacuum is working fine, it’s a good idea to reset it occasionally. This helps prevent any buildup of glitches or errors in its system and keeps it running smoothly.

How to Turn Off Shark Robot Vacuum?

Turning off your Shark robot vacuum is easy. Here’s how you can do it:

Find the power button: Look for the power button on your Shark robot vacuum. It’s usually located on the top or the side of the device.

Press and hold: Hold the power button for a few seconds. Hold it until the vacuum’s lights turn off or you hear a beep sound.

Release the button: Once you’ve held the power button for a long enough time, release it. This will turn off your Shark robot vacuum completely.

What do I do if I cannot turn off the Shark vacuum robot?

Check the Power Source: Ensure the Shark vacuum robot is not plugged in or receiving power from any source. Sometimes, it might not turn off if it’s still connected to electricity.

Try Different Buttons: If the power button isn’t working, try pressing other buttons on the vacuum. Some models have a separate button for turning off or resetting.

Remove the Battery: If your Shark vacuum robot has a removable battery, try taking it out. This can force the vacuum to shut down completely.

Customer Care: If none of the methods prove effective, contact customer support. They will be able to provide better advice based on your vacuum model.

Conclusion:

Consider resetting your Shark robot vacuum if you encounter issues like it getting stuck, not cleaning correctly, or experiencing software glitches. Additionally, periodic resets can help maintain its performance and prevent potential problems in the future.

By familiarizing yourself with the different reset methods and knowing when to use them, you can ensure that your Shark robot vacuum continues to keep your home clean and tidy with minimal fuss. If you encounter any difficulties, refer to this guide or seek assistance from Shark’s customer support.

Filed Under: Essentials

How long can fleas live in a vacuum cleaner?

February 22, 2024 by bigfishtavernlagunaadmin Leave a Comment

Fleas are tiny bugs that can make our pets itchy and uncomfortable. Sometimes, we need to vacuum our homes to eliminate these pesky insects. But have you ever wondered what happens to fleas once they get sucked up by the vacuum cleaner? Do they survive in there for a long time?

This article will explore whether flies live longer in a vacuum cleaner. We will analyze it simply for everyone to understand better and learn more about this tiny water and powerful vacuum cleaner.

How long can fleas live in a vacuum cleaner?

The Life Cycle Of Fleas

Fleas are pesky little bugs that can make our pets scratchy. But where do they come from, and how do they grow? Let’s look at fleas’ life cycle to understand them better.

Egg Stage: Fleas start their life cycle as tiny eggs. These eggs are usually laid on our pets’ fur but can also be found in carpets, bedding, or furniture where pets spend a lot of time. They are so small that we can’t see them without a magnifying glass!

Larva Stage: After about two days, the eggs hatch into larvae. Larvae are like tiny worms, and they love to hide in dark, cozy places like carpet fibers or cracks in the floor. They feed on things like flea dirt (that’s flea poop!) and other organic matter.

Pupa Stage: Next, the larvae spin themselves into a cocoon called a pupa. Inside the pupa, they undergo a magical transformation called metamorphosis, where they change into adult fleas. Depending on the conditions, this stage can last for several days to weeks.

Adult Stage: The adult fleas emerge from their cocoons, ready to jump onto a host and start the cycle again. Adult fleas need blood to survive and reproduce, so they’ll quickly hop onto a pet or even a human if they can.

Can flies live longer in a vacuum cleaner?

Fleas are tiny bugs that can make our pets itchy and uncomfortable. Sometimes, we need to vacuum our homes to eliminate these pesky insects. But have you ever wondered what happens to fleas once they get sucked up by the vacuum cleaner? Do they survive in there for a long time?

The answer is more complex than you might think. Fleas are tough little critters, but they’re not built to live in a vacuum cleaner. Here’s why:

Lack of Air: Fleas need air to breathe like we do. When they get sucked into the vacuum cleaner, they’re trapped in a small space with very little air. Without enough air, they can’t survive for long.

No Food or Water: Inside the vacuum cleaner, there’s no food or water for fleas to eat or drink. Fleas need blood to survive, and they can’t get that from the inside of a vacuum cleaner.

How long can fleas live in a vacuum cleaner?

Strong Suction: Vacuum cleaners have strong suction power, which can squash and squish fleas. Even if they manage to survive the lack of air and food, the force of the vacuum can be too much for them.

So, how long can fleas live in a vacuum cleaner? It’s hard to say, but most experts agree they don’t last long. Without air, food, or water, and with the vacuum’s strong suction, fleas probably only survive for a few days.

That’s why emptying the vacuum cleaner bag or canister regularly is essential, especially if you’ve been vacuuming up fleas. Getting rid of the captured fleas quickly helps prevent them from escaping back into your home and bothering your pets again.

Prevention And Control

Now that we know how long fleas can live in a vacuum cleaner (not long!) let’s talk about preventing them in the first place and controlling them if they do show up.

Regular Pet Care: Caring for your pets is one of the best ways to prevent fleas. Give them regular baths with flea shampoo, use flea prevention products recommended by your vet, and groom them often to spot and remove fleas or flea dirt.

Clean Your Home: Always keep your house clean, especially the area where your pets spend most of their time. Wash your pet’s bedding and blankets frequently, and remember to vacuum upholstered furniture too.

Outdoor Prevention: If your pets spend time outdoors, clean and tidy their outdoor areas. Trim bushes and grass where fleas like to hide and consider using flea control products in your yard.

Treat Infestations: If you find fleas in your home, taking action immediately is essential. Vacuuming is an excellent first step to remove adult fleas, eggs, and larvae, but you’ll also need to use flea control products to kill any remaining fleas and prevent new ones from hatching.

Consult a Professional: If you’re dealing with a severe flea infestation or if your pet reacts badly to flea bites, don’t hesitate to consult your vet or a pest control professional for help.

By preventing and controlling fleas, you can keep your home and pets happy and healthy all year round. 

Frequently Asked Questions

Q: How long can fleas live in a vacuum cleaner?

A: Fleas don’t usually survive for long inside a vacuum cleaner because they need air, food, and water to live. The strong suction and lack of these essentials make it difficult for them to survive for more than a few days.

Q: Can vacuuming alone eliminate fleas from my home?

A: Vacuuming can assist in removing adult fleas, eggs, and larvae from your home, but it might only partially eradicate a flea infestation. It’s crucial to complement vacuuming with flea control products and preventive measures to prevent fleas from returning.

Q: Should I vacuum my home daily to get rid of fleas?

A: While frequent vacuuming can help reduce the number of fleas in your home, vacuuming daily may only be necessary if you have a severe infestation. Aim to clean high-traffic areas and places where your pets spend much time at least once or twice a week.

Q: When must you ask for professional pest control help for flea problems?

A: If you’re facing a severe flea issue or find it hard to control it despite your attempts, it’s a good idea to contact professional pest control services. Trained exterminators can evaluate the situation and offer specific treatments to eliminate fleas successfully.

Conclusion

Fleas don’t last long in a vacuum cleaner. They need air, food, and water to survive, and the vacuum cleaner doesn’t provide them. Plus, the strong suction can squash them. So, if you’re worried about fleas in your home, vacuuming is an excellent way to eliminate them.

But remember, prevention is the best medicine! Take good care of your pets, keep your home clean, and use flea prevention products to stop fleas from becoming a problem in the first place.

You can keep your home and pets flea-free and happy by following simple steps. And if you do find fleas, don’t panic – grab your vacuum cleaner and get cleaning!

Filed Under: Essentials

  • « Go to Previous Page
  • Page 1
  • Interim pages omitted …
  • Page 5
  • Page 6
  • Page 7
  • Page 8
  • Go to Next Page »

Primary Sidebar

Recent Posts

  • Can You Deep Fry in a Nonstick Pan? My Surprising Results
  • Clay Pot vs Dutch Oven: Which One Right for You?
  • Are Dutch Ovens Non Toxic? All You Need to Know
  • Is Low Specific Heat Capacity Good for Frying Pans​
  • Smeg Kettle vs Mini Kettle: Which One Fits Your Style?

Copyright © 2024 bigfishtavernlaguna.com. All right reserved.